ezmlm
ezmlmは、qmailの開発者D. J. Bernstein氏により作成された大規模対応のメーリングリストで、qmailのMaildirにも対応し、fmlやMajordomoに比べ管理も容易です。
ezmlmのインストール
環境: Debian 10 buster
ダウンロード: # wget http://cr.yp.to/software/ezmlm-0.53.tar.gz
解凍後、cd ezmlm-0.53 error.h のファイルを編集し、extern int errno; を #include <errno.h> に書き換える
ezmlm-manage.c と ezmlm-return.c の 先頭に #include "log.h" を書き込む。
# make
# make man
# make setup
/usr/local/bin/ezmlm/ 以下にインストールされました。
# ls -la /usr/local/bin/ezmlm/
合計 324
drwxr-xr-x 2 root root 4096 8月 21 17:09 .
drwxr-sr-x 3 root root 4096 8月 21 17:09 ..
-rwxr-xr-x 1 root root 22832 8月 21 17:09 ezmlm-list
-rwxr-xr-x 1 root root 31056 8月 21 17:09 ezmlm-make
-rwxr-xr-x 1 root root 43640 8月 21 17:09 ezmlm-manage
-rwxr-xr-x 1 root root 22808 8月 21 17:09 ezmlm-reject
-rwxr-xr-x 1 root root 35184 8月 21 17:09 ezmlm-return
-rwxr-xr-x 1 root root 35248 8月 21 17:09 ezmlm-send
-rwxr-xr-x 1 root root 26896 8月 21 17:09 ezmlm-sub
-rwxr-xr-x 1 root root 26896 8月 21 17:09 ezmlm-unsub
-rwxr-xr-x 1 root root 39480 8月 21 17:09 ezmlm-warn
-rwxr-xr-x 1 root root 23056 8月 21 17:09 ezmlm-weed
/usr/local/bin/ezmlm/ 以下の ezmlm のコマンドバイナリ群にパスが使えるように設定します。 /etc/profile を編集してPATHに :/usr/local/bin/ezmlm を追加します。
PATH="/usr/local/sbin:/usr/local/bin:/usr/sbin:/usr/bin:/sbin:/bin:/usr/local/bin/ezmlm"
Profileを反映させます。 # source /etc/profile
テストは qmaildamin 導入後に行います。
設定
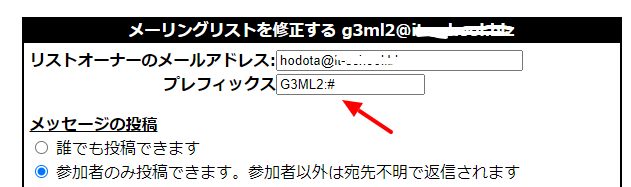
メーリングリストのタイトルに、連番でメーリングリストの番号を表示させるには、qmailadminの画面で、メーリングリストのプレフックスに、メーリングリストの名前の後に :# を追加します。
ezmlm-idx
ezmlm-idxは、ezmlmを拡張するパッチプログラムで、Frederik P.Lindberg氏によって開発・メンテナンスされています。ダイジェストリストを作成したり、Subjectを加工したりできるようになります。
詳しい情報: http://untroubled.org/ezmlm/
ezmlm-idxのインストール
ezmlm-idxの情報: http://untroubled.org/ezmlm/
ダウンロード: # wget http://untroubled.org/ezmlm/archive/7.2.2/ezmlm-idx-7.2.2.tar.gz
ezmlm-0.53.tar.gzと同じディレクトリに保存し、インストールします。
# tar xvfz ezmlm-idx-7.2.2.tar.gz
# mv ezmlm-idx-7.2.2/* ezmlm-0.53/
# cd ezmlm-0.53
# ln -s /.../.../ezmlm-0.53/lang/ja /.../.../ezmlm-0.53/lang/default
# make clean
# make
# make man
# ./ezmlm-test
# make install
# cp /.../.../ezmlm-0.53/ezmlm-cgi /usr/lib/cgi-bin/
# chmod 4555 /usr/lib/cgi-bin/ezmlm-cgi
※ezmlm-idx-7.2.2のインストールで参考にしたURL: https://qmailrocks.thibs.com/ezmlm-idx.php ただしこのサイトでは、インストール先がezmlm-idx-7.2.2を解凍したディレクトリになっているので、ezmlm-0.53へ変更しました。
http://untroubled.org/ezmlm からフォークしたezmlm-idx の情報:https://github.com/mbhangui/ezmlm-idx
Easy Mailing List Manager for indimail-mta, qmail
Webツール
- ezmlm-browse サンプルは http://lists.untroubled.org
- ezmlm-www
- ezmlm-web
ezmlm-browseのインストール
ダウンロード: wget http://untroubled.org/ezmlm-browse/ezmlm-browse-0.20.tar.gz
ソースデータ: https://github.com/bruceg/ezmlm-browse
インストール手順
# cat INSTALL
Building the Sources
====================
- Unpack the ezmlm-browse sources into a non-web-visible directory. If
you are using the setuid wrapper (see below), this is the directory
from which ezmlm-browse will execute.
- Make sure all the conf-* files have values appropriate for your
system (they contain notes about what they are used for). They are
set to appropriate defaults for most systems using GCC.
- If your python program is not in the path, put the full path to it in
the first line of a file called "auto-python".
If in doubt, skip this step.
- Run "make".
Simple Installation
===================
- As a user that has read access to the list archives, run:
./ezmlm-browse-setup --apache DESTPATH TARGET.cgi
where: DESTPATH is the destination directory into which the files will
be installed, TARGET.cgi is the CGI filename to install. For the
simplest usage this target will be "index.cgi", but if you have other
CGI scripts in the same directory you may name it something else.
Generic Installation
====================
- Copy either "ezmlm-browse" (if your web server is using Apache suexec
or equivalent) or "wrapper" (for setuid execution) into a location
where CGI programs may be executed. Usually this is either something
in a "cgi-bin" directory or a file elsewhere named "something.cgi".
The destination name does not need to be either "wrapper" or
"ezmlm-browse" as the script will automatically determine its own name
for the links it creates.
- Make sure the resulting program is executable and owned by the a that
has read access to the list archives.
- If your web server runs as a user that cannot read the mailing list
archives (normally true) and does not use the Apache suexec or
equivalent module, make the copy of the "wrapper" program setuid to a
user that has read access to the mailing list archive files. Do *NOT*
make any Python script setuid.
- Copy in the "ezmlm-browse.ini" file and edit it as appropriate for
your site and lists.
- If using Apache with the program in a directory other then "cgi-bin",
make sure CGI execution is enabled in that directory by adding the
following lines to a ".htaccess" file in the same directory:
Options +ExecCGI
AddHandler cgi-script .cgi
DirectoryIndex index.cgi
Other server software should be similarly configured.
Configuration
=============
- Edit ezmlm-browse.ini in the destination directory to declare which
mailing lists are visible to the web, and set the other defaults as
appropriate.
- Mailing lists should have the ezmlm-make "-i" option enabled to keep
the necessary indices up to date. If this is not enabled, run the
following command for each list:
ezmlm-make -+ -i /path/to/list
ただし、Webでメーリングリストが閲覧できるのは便利ですが、アクセス権限などを厳格に設定しないと、メーリングリストの内容が公開されてしまいます。
なので、過去のメーリングリストのデータを見たい場合は、ezmlmのコマンドで取得したほうが、安全、安心だと思います。
ダイジェストメールの有効化
ダイジェストメールの場合は「[email protected]」になります。同様に、ダイジェストメールをやめるには「[email protected]」に空メッセージを送信します。
※メッセージやタイトルなどで文字化けが起きる場合は、メールソフトでのテキストエンコーディングで、Unicodeに設定します。
123 から145のメッセージを取得 メーリングリスト名[email protected]
123 から145のインデック付のメッセージを取得 メーリングリスト名[email protected]
autoresponderのインストール
参照したURL: https://www.atmarkit.co.jp/ait/articles/0203/09/news002_2.html
適当な作業ディレクトリにダウンロードして展開します。
ダウンロード: wget https://sourceforge.net/projects/qmailadmin/files/autorespond/2.0.4/auto...
# tar xvfz autorespond-2.0.4.tar.gz
# cd autorespond-2.0.4/
# make
# make install
※これで/usr/local/bin/autorespondがインストールされました。qmailadminから使用することが目的ですから、直接autorespondを使用する機会は少ないと思いますが概要だけ確認しておきます。
autoresponderの使用方法は、「.qmail」ファイルに次の1行を記述します。
| /usr/local/bin/autorespond time num message dir [ flag arsender ]
引数やオプションの意味
time:numに使う受付時間(単位:秒)
num:timeで指定された時間以内に受け付けるメールの最大数
message:応答メッセージファイル
dir:ログを作成するディレクトリ
flag(送信されてきたメッセージの扱い方)
0:応答メッセージに添付しない
1:応答メッセージに添付(デフォルト指定)
arsender(応答メッセージ中の差出人)
+:Fromを空にする
$:送られてきたメッセージ中の「To:」を使用