OS
Android
Android OS
開発環境
scrcpy
Androidスマホ画面をWindowsで表示させるアプリです。
ダウンロード: https://github.com/Genymobile/scrcpy/releases
Android13スマホでは、設定 -> システム -> 開発者向けオプション -> デバッグ -> USBデバッグ を有効にします。
タグ:
CentOS
CentOSについて説明します
カテゴリーごとに、下記のページを参照して下さい
備考
CentOS 6 のインストールについて
CentOS 6 からはSELinux機能がインストール時に、標準ではON(稼働する)状態でインストールされます。さまざまプログラムでセキュリティ制限など、影響が出る場合はSELinuxをOFFに設定して再起動します。
/etc/sysconfig/selinux の中で SELINUX=disabled で設定
もしくは、インストール時のCentOS ロゴ画面で、[Esc]ボタンを押し、 boot: selinux --disabled でインストール実行
インストール後に、英語モードから日本語モードへ変更させたい場合
# yum groupinstall "Japanese Support"

# vim /etc/sysconfig/i18n

LANG="ja_JP.UTF-8"
再起動が好ましい
DNSサーバー
DNS、Bindについて
DNSサーバー Bind
環境: (CentOS のバーション不明)
/etc/named.conf
新規ドメイン名を登録
/var/named/
/var/named/chroot/var/named
新規ドメインのzoneファイル作成
[root@pori named]# /etc/init.d/named restart
named を停止中: [ OK ]
named を起動中: [ OK ]
オープンソースソフトウェア:
LDAP
OpenLDAPについて
OpenLDAPはTCP/IPで実装されたディレクトリサービス用のプロトコル、LDAP(Lightweight Directory Access Protocol)のオープンソースソフトウェア版です。
LDAPのバージョン2とバージョン3の両方のプロトコルに対応しており、汎用性があります。
開発は OpenLDAP Foundationが運営するOpenLDAP Projectで行われております。
OpenLDAPの用語
DN (Disingunished Name) : 各エントリーで持っているユニークな名前の属性
RDN (Relative Distingunished Name) : エントリ検索を容易にするたに、上位のエントリ名を含まない名前の属性
objectClass : エントリに設定する必要がある属性、もしくは設定することができる特別な属性
スキーマ定義 : objectClassの定義
dc (DOmain Component) : ドメインの構成要素
o (Organization) : 組織名
ou (Organization Unit) : 組織の単位
cn (Common Name) : 一般の名称
インストール
環境: CentOS 6.4 の場合 Sambaとの連携を想定
1)パッケージのインストール openldap-servers openldap-clients です。
openldapは一般的にデフォルトでインストール済が多い、libtool-ltdlはopenldap-clientsの依存パッケージです 。
# yum install openldap-servers openldap-clients
2)設定用ディレクトリのパスワード作成
# slappasswd
/etc/openldap/slapd.conf/cn=config/olcDatabase={0}config.ldif ファイルを開いて、oclRootPW として作成したパスワードを記入し保存します。
3)データベースチューニングのための設定ファイル
# cp -ar /usr/share/openldap-servers/DB_CONFIG.example /var/lib/ldap/DB_CONFIG
# chown -R ldap:ldap /var/lib/ldap/DB_CONFIG
4)設定ファイルの作成
/etc/openldap に slapd.conf を作成し、 slappasswdコマンドで作成したパスワードを記入し保存します。
5)LDAPサービスの起動
# service slapd start もしくは # /etc/rc.d/init.d/slapd start
LDAPサービスの制御スクリプト引数として start stop status restart condrestart configtest
6)LDAPデータベースの基本設定
基本設定の確認 -D オプションでルートDNを指定し DN(cn=config))配下のエントリに対して検索します。
# ldapsearch -x -LLL -D 'cn=config' -W -b 'cn=config' '(olcDatabase={1}bdb)'
もしくは
# ldapsearch -x -LLL -D 'cn=config' -W -b 'cn=config' '(objectClass=*)'
結果の内容から /var/lib/ldap/ にデータが保存され、olcSuffixでLDAPデータベースツリーのDN、olcRootDNでLDAPサーバの管理用アクセス権のある特権DNの設定が確認出来ます。
olcRootPWは設定されていません。
7)データ用ディレクトリの管理情報を変更
データ変更用のLDIFファイル(bdb-init.ldif)を作成します。 以下のように、 DN名やolcDatabase={ } などは調整して下さい
dn: olcDatabase={2}bdb,cn=config
changetype: modify
replace: olcRootDN
olcRootDN: cn=Manager,dc=sambadom1,dc=local
-
replace: olcSuffix
olcSuffix: dc=sambadom1,dc=local
-
add: olcRootPW
olcRootPW: {SSHA}xxxxxxxxxxxxxxxxxxxxxxxxxxx
8)LDAPサーバで管理するデータを登録
以下のサンプルldifファイルはSambaとOpenLDAPとの連携をするときを想定した内容です。実際の運用環境に合わせて調整します。
組織、グループ、ユーザアカウントの基本となるLDAPデータ
dn: dc=sambadom1,dc=local
objectClass: top
objectClass: dcObject
objectClass: organization
o: dc=sambadom1,dc=local
dc: sambadom1
dn: cn=Manager,dc=sambadom1,dc=local
objectClass: organizationalRole
cn: Manager
dn: ou=users,dc=sambadom1,dc=local
objectClass: top
objectClass: organizationalUnit
ou: users
dn: ou=groups,dc=sambadom1,dc=local
objectClass: top
objectClass: organizationalUnit
ou: groups
dn: ou=idmap,dc=sambadom1,dc=local
objectClass: top
objectClass: organizationalUnit
ou: idmap
dn: ou=computers,dc=sambadom1,dc=local
objectClass: top
objectClass: organizationalUnit
ou: computers
グループのアカウントに関するLDAPデータ
Sambaとの連携ではSambaデータベースからデータを移行します。
ユーザーのアカウントのLDAPデータ
Sambaとの連携ではSambaデータベースからデータを移行します。
データアクセスの制御
/etc/openldap/slapd.d/cn=config/olcDatabase={1}dbd.cn=config ファイルで dn名やその他の設定を調整します。
9)slapd.confの設定
/etc/openldap/slapd.conf ファイルをSamba用に設定する 詳細は別途
Sambaのスキーマ( /usr/share/doc/samba-3.6.9/LDAP/samba.schema )を /etc/openldap/schema へコピー
10)Linux認証のLDAP化
UNIXユーザの情報もLDAPに格納するプログラム nss-pam-ldapd pam_ldap nscd をインストール
# yum install nss-pam-ldapd nscd pam_ldap
# authconfig --enableldap --enableldapauth --ldapserver=127.0.0.1 --ldapbasedn=dc=sambadom1,dc=local --update
11)Winbindの設定と起動 # authconfig --enablewinbindauth --update
nscdは二重キャッシュになるのでサービスを停止
12)net sam provision コマンドでSamba用の初期ユーザやグループを作成
環境: Debian の場合
備考
CentOS 6.4 でのOpenLDAPのインストール
ここのページを参考にします >> ここから
olcRootPW を olcDatabase={0}config.lfid に編集して追加します。 olcDatabase{2}bdb.ldif には必要ありません。
再インストールする場合
OpenLDAP Server を再インストールするときなどは、 /var/lib/ldap 以下のOpenLDAPのBDBデータを削除するか、別の場所に新規保存するようにします。
どちらの場合もDB_CONFIGファイルを新規設定します。
また、/etc/openldap のディレクトリも削除されているか確認します。
LDAPデータベースのバックアップ
CentOS 6.4 でアーカイブする場合 (下記の手順では、キャッシュ用の一時ファイルは削除しています)
# service slapd stop

# cd /var/lib/ldap

# tar cvzf /var/lib/ldap_backup.tar.gz --exclude __db.* /var/lib/ldap/

# service slapd start
CentOS 6.4 でLDIFファイルに書き出す場合もLDAPデータベースは停止した状態で実行します。
phpldapadmin のインストール
CentOSの場合 phpldapadmin のダウンロードとインストール(標準レポジトリにはないので外部レポジトリからダウンロード)
# yum install phpldapadmin
/etc/httpd/conf.d/phpldapadmin.conf を編集し、 Allow from 127.0.0.1 の行に アクセスするネットワーク、例えば 192.168.0.0/24 を追加
/etc/phpldapadmin/config.php を編集し、以下の内容に修正する。
397行をコメントアウトし 398行をコメントに設定する
$servers->setValue('login','attr','dn');
//$servers->setValue('login','attr','uid');
ブラウザから localhost/ldapadmin で起動

OpenLDAPのログの設定
CentOS 6.4 の場合
1)LDAPサーバのログファシリティとログレベルの調整
/etc/sysconfig/ldap ファイルを編集します SLAPD_OPTIONS="-l local4 -s 512" を挿入します。
デバックレベルは必要に応じて増減します
例えば 512 は送られたエントリのステータス
2048 はエントリの解析処理
65535 ですべてのレベルを表示
2)/etc/rsyslog.conf ファイルに以下の行を追加します
local4.* /var/log/slapd.log
3)念のためにrsyslog とOpenLDAPの再起動後、ログの確認
# service rsyslog restart

# service slapd restart

# cat /var/log/slapd.log
GUIで管理できる便利なツール(Samba対応)
LAM (Ldap Account Manager) Webブラウザで管理できる 開発元のサイト
GOsa2 LDAPデータベースでアカウントやシステムを管理できるフレームワーク 開発元のサイト
Webmin Linuxのシステム管理ツールで、LDAP、SAMBAもサポート
LDAP Admin WindowsベースのLDAP管理ツール SAMABも対応
Apache Directory Studio Apache FoundationのLDAPプロジェクトとして開発されている 開発元のサイト
タグ:
オープンソースソフトウェア:
smbldap-tools
smbldap-toolsのインストール
OpenLDAPとSambaを連携するツールです。
設定方法
CentOS 5.4 の場合 参考サイト http://www.oss-d.net/samba-openldap
CentOS 5.3 でテストしました。 smbldap-populate でLDAPデータベース初期化する前に、以下の項目を調整します。
NetBIOS名やサーバ名の定義を、テスト環境のサーバ名に変更します。
DN名 dc=oss,dc=dip,dc=jp で統一させる
smb.conf ファイルで [global] を追加する。 さらに、home netlogin profiles public などのディレクトリを変更する、たとえば /home/sambaを作成して。 profile acls = yes は設定しない。
smb.conf ファイル作成後、smbpasswd -w ldapadmin の実行。 SambaからLDAPディレクトリへのアクセスで使用する「ldap admin dn」 で指定したDNのパスワード(ldapadmin)を格納します。
smbldap_bind.conf では、slavePW と masterPW をテキスト ldapadmin で入力
slapd.conf ファイルの rootpw はslappasswd コマンドで作成した ldapadmin をSSHA形式で記入する。 また、 index のところは index sambaSID eq というⅠ行だけ追加します。
samba は起動しない状態で、smbldap-populate コマンドを実行します。
タグ:
オープンソースソフトウェア:
Telnet
Telnet サーバ
一般的にTelnetサーバは起動しないように設定をしますが、ローカルホスト経由でログインや通信のテスト環境として運用する場合があります。 あくまでもテスト環境だけとします。
インストール
CentOS 6.4 の場合
Telnet サーバのインストール yum install telnet-server telnet
Telnetサーバが起動できるように設定 vim /etc/xinetd.d/telnet disable=yesをdisable=no に変更
ファイヤーウォールの設定も忘れず GUIで設定するか ファイルを編集する /etc/sysconfig/iptables
23番portを通しておく。以下の1行があればOK。
-A RH-Firewall-1-INPUT -m state -state NEW -m tcp -p tcp -dport 23 -j ACCEPT
サービスの再起動 /etc/rc.d/init.d/xinetd restart
動作確認は telnet 192.168.0.161
オープンソースソフトウェア:
VNC
VNCサーバーとクライアント
VNC Server
環境: CentOS 6.4 の場合
1) インストール yum -y install tigervnc-server
2) 起動、スタータスなどの確認 /etc/rc.d/init.d/vncserver start /etc/rc.d/init.d/vncserver status
3) 必要ならば、設定変更 /etc/sysconfig/vncservers を編集 以下の内容を最後の行に追加
解像度は 1600x1200 1920x1080 1920x1200 など
4) パスワードの設定 root権限で vncpasswd コマンドで設定
5) ファイアーウォールの設定
システム->管理->ファイアウォールで、ポート 5900-5910 をオープンします。
6) 起動は /etc/rc.d/init.d/vncserver start または sudo vncserver :1
もし解像度を指定する場合は vncserver -geometry 1920x1080 :1
停止 sudo vncserver -kill :1
オープンソースソフトウェア:
レポジトリの設定
CentOSのレポジトリ
CentOS 6.4 の場合
yumを使用する場合、標準のレポジトリは /etc/yum.repos.d/ で定義されております。
デフォルトレポジトリ以外のレポジトリを参照させる場合、外部レポジトリごとにインストールします。 EPELというレポジトリを取り込む場合は
CentOS 6 の64ビット版をダウンロード
wget http://ftp-srv2.kddilabs.jp/Linux/distributions/fedora/epel/6/x86_64/epel-release-6-8.noarch.rpm
RPMでインストール
rpm -ivh epel-release-6-8.noarch.rpm
インストールは /etc/yum.repos.d/epel.repo というファイルを作成します。 もしデフォルトでEPELレポジトリが起動しない場合は、そのファイル内で enabled=1 と設定します。
タグ:
オープンソースソフトウェア:
良く使うコマンド
各種コマンドの使い方
yumコマンド
環境: CentOS 6.4 の場合
List of Commands:
check Check for problems in the rpmdb
check-update Check for available package updates
clean Remove cached data
deplist List a package's dependencies
distribution-synchronization Synchronize installed packages to the latest available versions
downgrade downgrade a package
erase Remove a package or packages from your system
groupinfo Display details about a package group
groupinstall Install the packages in a group on your system
grouplist List available package groups
groupremove Remove the packages in a group from your system
help Display a helpful usage message
history Display, or use, the transaction history
info Display details about a package or group of packages
install Install a package or packages on your system
list List a package or groups of packages
load-transaction load a saved transaction from filename
makecache Generate the metadata cache
provides Find what package provides the given value
reinstall reinstall a package
repolist Display the configured software repositories
resolvedep Determine which package provides the given dependency
search Search package details for the given string
shell Run an interactive yum shell
update Update a package or packages on your system
update-minimal Works like update, but goes to the 'newest' package match which fixes a problem that affects your system
updateinfo Acts on repository update information
upgrade Update packages taking obsoletes into account
version Display a version for the machine and/or available repos.
Options:
-h, --help show this help message and exit
-t, --tolerant be tolerant of errors
-C, --cacheonly run entirely from system cache, don't update cache
-c [config file], --config=[config file]
config file location
-R [minutes], --randomwait=[minutes]
maximum command wait time
-d [debug level], --debuglevel=[debug level]
debugging output level
--showduplicates show duplicates, in repos, in list/search commands
-e [error level], --errorlevel=[error level]
error output level
--rpmverbosity=[debug level name]
debugging output level for rpm
-q, --quiet quiet operation
-v, --verbose verbose operation
-y, --assumeyes answer yes for all questions
--version show Yum version and exit
--installroot=[path] set install root
--enablerepo=[repo] enable one or more repositories (wildcards allowed)
--disablerepo=[repo] disable one or more repositories (wildcards allowed)
-x [package], --exclude=[package]
exclude package(s) by name or glob
--disableexcludes=[repo]
disable exclude from main, for a repo or for
everything
--obsoletes enable obsoletes processing during updates
--noplugins disable Yum plugins
--nogpgcheck disable gpg signature checking
--disableplugin=[plugin]
disable plugins by name
--enableplugin=[plugin]
enable plugins by name
--skip-broken skip packages with depsolving problems
--color=COLOR control whether color is used
--releasever=RELEASEVER
set value of $releasever in yum config and repo files
--setopt=SETOPTS set arbitrary config and repo options
Plugin Options:
--security Include security relevant packages
--bugfixes Include bugfix relevant packages
--cve=CVE Include packages needed to fix the given CVE
--bz=BZ Include packages needed to fix the given BZ
--sec-severity=SEVERITY
Include security relevant packages, of this severity
--advisory=ADVISORY
Include packages needed to fix the given advisory
sudo コマンドの設定
環境: CentOS 6.4 の場合
もしsudoパッケージがインストールされていない場合は yum -y install sudo でインストールします。
root権限で visudo を実行し、最後に追加 ユーザー名 ALL = NOPASSWD: ALL と追加します。
date コマンド
ファイル作成時に日付をファイル名に付加する
tar cvfz `date +%Y%m%d_%H%M`.tar.gz ターゲットファイル <- 2019年2月2日15時34分の場合 20190202_1534
オープンソースソフトウェア:
Debian
Debian Linux
Intall 全般について
Debian 5 (lenny) からDebian 6 (squeeze) へのアップグレード
ファイル /etc/apt/sources.list の中で lenny をsqueezeへ変更して、apt-get update -> apt-get upgrade を実行します
その後システム全体のアップグレード # apt-get dist-upgrade
Debian 6 (squeeze) から7 (wheezy)へアップグレード
Debian 6 を最新にアップデイトと現状のバックアップ
さらにパッケージの状態を確認 # dpkg --audit # dpkg -l | more などで
APTの取得先を変更 /etc/apt/sources.list ファイルを編集し squeeze を wheezy へ変更 以下の行を追加します。
deb http://mirrors.kernel.org/debian wheezy main contrib
システムの最小アップグレード # apt-get update # apt-get upgrade
その後、システム全体のアップグレード # apt-get dist-upgrade
もし 「パッケージパッケージ」の即時設定は動作しません。詳細については man 5 apt.conf の APT::Immediate-Configure の項を参照してください というエラーが起きたら以下のコマンドを入力します。
# apt-get dist-upgrade -o APT::Immediate-Configure=0
その他アップグレードで障害が起きた場合はDebianサイトで詳細確認 ここから
※2014年1月、Debian 6 (squeeze) から7 (wheezy)へアップグレードした際に、以下の現象が起こりました。
apache2 の hppd.conf という空ファイルができていない事でapache2が起動しなかった
PHPで以下の警告が出たので、 suhosin モジュールを削除 apt-get purge php5-suhosin
Postfix起動時に警告 unused parameter: mynetwork_style=subnet が表示されたので、/etc/postfix/main.cf で mynetwork_style の行をコメントに設定してPostfix 再起動
Debian 7 (wheezy) から 8 (jessie)へアップグレード
Debian 7 を最新にアップデイトと現状のバックアップ
さらにパッケージの状態を確認 # dpkg --audit # dpkg -l | more などで
APTの取得先を変更 /etc/apt/sources.list ファイルを編集し wheezy を jessie へ変更 以下の行を追加します。
deb http://mirrors.kernel.org/debian jessie main contrib
システムの最小アップグレード # apt-get update # apt-get upgrade
その後、システム全体のアップグレード # apt-get dist-upgrade
その他アップグレードで障害が起きた場合はDebianサイトで詳細確認 ここから
Debian 8 (jessie) から 9 (stretch)へアップグレード
Debian 8を最新にアップデイトと現状のバックアップ
アップデイトは # apt-get update # apt-get upgrade # apt-get dist-upgrade
さらにパッケージの状態を確認 # dpkg --audit # dpkg -l | more などで
APTの取得先を変更 /etc/apt/sources.list ファイルを編集し jessie を stretch へ変更 以下の行を追加します。
deb http://mirrors.kernel.org/debian stretch main contrib
システムの最小アップグレード # apt-get update # apt-get upgrade
その後、システム全体のアップグレード # apt-get dist-upgrade
reboot してアップグレードしたことを確認 $ uname -mrs $ lsb_release -a
注意事項:
Apache MySQL PHPがjessieの環境を以降できない現象が起きた場合は、モジュールの設定ファイルをバックアップし、モジュールごとに削除、インストールを行ないます。
その他アップグレードで障害が起きた場合はDebianサイトで詳細確認 ここから
Debian 9 (stretch)新規インストール
aptのsources.listファイルの設定(2019年6月17日現在)
/etc/apt/sources.list
deb http://ftp.jp.debian.org/debian stretch main contrib non-free
deb-src http://ftp.jp.debian.org/debian stretch main contrib non-free
deb http://security.debian.org/ stretch/updates main contrib non-free
deb-src http://security.debian.org/ stretch/updates main contrib non-free
Debian 10 buster 新規インストール
/etc/apt/sources.listファイルの設定(Debian 10.1.0 2019年10月5日現在)
deb http://deb.debian.org/debian/ buster main
deb-src http://deb.debian.org/debian/ buster main
deb http://security.debian.org/debian-security buster/updates main
deb-src http://security.debian.org/debian-security buster/updates main
# buster-updates, previously known as 'volatile'
deb http://deb.debian.org/debian/ buster-updates main
deb-src http://deb.debian.org/debian/ buster-updates main
さくらのクラウドでDebian 9からDeian10へアップグレードする場合、必須ではないけどJPサイトを指定しました。contrib non-free も追加した場合。
既存のパッケージの状態を確認します。 sudo dpkg --audit 何も結果がなければ問題がないのでOKです。
現状の /etc/apt/sources.list で特別なレポジトリがあるか確認します。
stretch -> buster へ書き換え
sed -i -e 's/stretch/buster/' /etc/apt/sources.list
deb http://ftp.riken.jp/Linux/debian/debian/ buster main contrib non-free
deb-src http://ftp.riken.jp/Linux/debian/debian/ buster main contrib non-free
deb http://security.debian.org/debian-security buster/updates main contrib non-free
deb-src http://security.debian.org/debian-security buster/updates main contrib non-free
deb http://ftp.riken.jp/Linux/debian/debian/ buster-updates main contrib non-free
deb-src http://ftp.riken.jp/Linux/debian/debian/ buster-updates main contrib non-free
以下のコマンド実行、apt update 実行でレポジトリの取得エラーなどがないか確認します。エラーの場合は別のレポジトリに変更します。
apt update
apt autoremove
apt clean
apt-get upgrade
apt full-upgrade
apt-get upgradeを実行後、minissdpdパッケージを使うかどうか聞いてきました。使わない設定が良いと思います。途中でminissdpdパッケージをapt purgeしました。その後upgradeを実行し、full-upgrade を実行
※参考にしたサイト:https://sysrigar.com/2020/02/22/debian%E3%82%929stretch%E3%81%8B%E3%82%8...
◆ さくらのクラウドでDebian10からDeian11へアップグレードする場合
既存のパッケージの状態を確認します。 sudo dpkg --audit 何も結果がなければ問題がないのでOKです。
現状の /etc/apt/sources.list で特別なレポジトリがあるか確認します。
buster -> bullseye へ書き換え
sed -i -e 's/buster/bullseye/' /etc/apt/sources.list
sedコマンド実行後に deb http://security.debian.org/debian-security buiiseye/updates mainなどになっている場合は、 bullseye-security main に修正します。
deb http://deb.debian.org/debian bullseye main
deb-src http://deb.debian.org/debian bullseye main
deb http://security.debian.org/debian-security bullseye-security main
deb-src http://security.debian.org/debian-security bullseye-security main
deb http://deb.debian.org/debian bullseye-updates main
deb-src http://deb.debian.org/debian bullseye-updates main
アップグレードコマンド
apt update
apt upgrade --without-new-pkgs
apt full-upgrade
※参考にしたサイト:https://sysrigar.com/2021/08/21/debian-10-buster%E3%81%8B%E3%82%8911-bul...
Debian 11 bullseye 新規インストール
/etc/apt/sources.listファイルの設定(Debian 11.1.0 2022年4月1日現在)
deb http://ftp.jp.debian.org/debian/ bullseye main
deb-src http://ftp.jp.debian.org/debian/ bullseye main
deb http://security.debian.org/debian-security bullseye-security main
deb-src http://security.debian.org/debian-security bullseye-security main
deb http://ftp.jp.debian.org/debian/ bullseye-updates main
deb-src http://ftp.jp.debian.org/debian/ bullseye-updates main
Debian 11 での non-free contribute pacakges は
deb http://ftp.jp.debian.org/debian/ bullseye main contrib non-free
deb-src http://ftp.jp.debian.org/debian/ bullseye main contrib non-free
deb http://security.debian.org/debian-security bullseye-security main contrib non-free
deb-src http://security.debian.org/debian-security bullseye-security main contrib non-free
deb http://ftp.jp.debian.org/debian/ bullseye-updates main contrib non-free
deb-src http://ftp.jp.debian.org/debian/ bullseye-updates main contrib non-free
◆ さくらのクラウドでDebian11からDeian12へアップグレードする場合
bullseye --> bookworm へ書き換え
sed -i -e 's/bullseye/bookworm/' /etc/apt/sources.list
さくらのクラウドで運用する場合の /etc/apt/sources.list
deb http://ftp.jp.debian.org/debian/ bookworm main
deb-src http://ftp.jp.debian.org/debian/ bookworm main
deb http://security.debian.org/debian-security bookworm-security main
deb-src http://security.debian.org/debian-security bookworm-security main
deb http://ftp.jp.debian.org/debian/ bookworm-updates main
deb-src http://ftp.jp.debian.org/debian/ bookworm-updates main
contrib non-free-firmwareのレポジトリを追加した場合の /etc/apt/sources.list
deb http://deb.debian.org/debian bookworm main contrib non-free non-free-firmware
deb http://deb.debian.org/debian bookworm-updates main contrib non-free non-free-firmware
deb http://deb.debian.org/debian-security/ bookworm-security main contrib non-free non-free-firmware
アップグレードコマンド
apt update
apt upgrade --without-new-pkgs
apt full-upgrade
◆ さくらVPSでDebian11からDeian12へアップグレードする場合
現状のシステムを更新します。
sudo apt update
sudo apt upgrade -y
sudo apt full-upgrade -y
sudo apt autoremove -y
sudo reboot
/etc/apt/sources.list で bullseye --> bookworm へ書き換え
sudo sed -i 's/bullseye/bookworm/g' /etc/apt/sources.list
/etc/apt/sources.list.d/*list で追加のPHPなどのレポジトリも変更します。
sudo sed -i 's/bullseye/bookworm/g' /etc/apt/sources.list.d/*.list
基本パッケージの取得
sudo apt update
最小限のアップグレード
sudo apt upgrade --without-new-pkgs
フルアップグレード
sudo apt full-upgrade
完了後再起動でバージョン確認
sudo reboot

cat /etc/debian_version
Debian 10 Buster
サスペンド設定
再起動後20分程度でシステムが止まって(サスペンド)しまう現象。この現象は、デスクトップ環境をインストールした場合に影響すると思われます。インストールするデスクトップ環境によっては、設定内容がことなると思います。
参考にしたページ: https://qiita.com/ikesama200/items/f595293de82ddc9fa3f1
GUIからはサスペンド設定が変更できないので、以下のファイルを修正します。
/usr/share/gdm/dconf/90-debian-settings -> /etc/gdm3/greeter.dconf-defaults
リンク元の /etc/gdm3/greeter.dconf-defaults を編集して、最終行に追加
sleep-inactive-ac-timeout = 0
sleep-inactive-battery-timeout = 0
システムを再起動して20分でサスペンドしないか確認します。
サスペンド、スリープ、ハイバネ―トコマンド
- ハイブリッドスリープ sudo systemctl hybrid-sleep
- ハイバネ―ト sudo systemctl hibernate
- サスペンド sudo systemctl suspend
Debian 8(Jessie) 以降のサスペンド設定
概要: https://wiki.debian.org/Suspend
サスペンドおよびハイバネーションを無効にする場合
sudo systemctl mask sleep.target suspend.target hibernate.target hybrid-sleep.target
実行例(debian9):$ sudo systemctl mask sleep.target suspend.target hibernate.target hybrid-sleep.target
Created symlink /etc/systemd/system/sleep.target → /dev/null.
Created symlink /etc/systemd/system/suspend.target → /dev/null.
Created symlink /etc/systemd/system/hibernate.target → /dev/null.
Created symlink /etc/systemd/system/hybrid-sleep.target → /dev/null.
上記を有効化する場合
sudo systemctl unmask sleep.target suspend.target hibernate.target hybrid-sleep.target
設定した内容でシステムを有効化
systemctl restart systemd-logind.service または リブート
Debian 11 bullseye でサスペンドを無効
参考にしたサイト https://takuya-1st.hatenablog.jp/entry/2021/11/26/172528
スリープを無効にする場合
sudo systemctl mask sleep.target suspend.target hibernate.target hybrid-sleep.target
Apacheについて
Debian 7 (wheezy) から 8 (jessie)へアップグレード
Debian 8 からApacheのバージョンが2.4になりました。Debian 7の2.2から大幅に違います。
Apacheの設定ファイルの変更
Order allow,denyは使えないので、下記のように修正する
# Order allow,deny
Require all granted
/etc/apache2/sites-availableにある設定ファイル全ての最に「.conf」を付ける
既存の設定をバックアップし、a2dissite * で活性化されているサイト全てを非活性にする
サイトを活性化する a2ensite *
Apacheを再起動
Debianコマンド
addgroup 参照サイト ここから
・Groupの追加
#addgroup hogehoge
・グループIDを指定する場合は、
#addgroup --gid 1200 hogehoge
・Groupの削除
#delgroup hogehoge
adduser 参照サイト ここから
・ユーザーの追加
#adduser hoge
ホームディレクトリなども作成してくれます。
またデフォルトで必要なファイルは、/etc/skel/内のファイルがホームディレクトリへコピーされます。
・UIDを指定する
#adduser --uid 1200 hoge
・グループを指定する場合。
#adduser --ingroup hogehoge hoge
・ホームディレクトリを指定する
#adduser --ingroup hogehoge --home /home/hogehoge
・システムユーザー(ログインできないユーザー)を作成する。
#adduser --system hoge
・グループを指定する場合
#adduser --system --ingroup hogehoge hoge
・ホームディレクトリを指定する
#adduser --system --ingroup hogehoge --home /var/hoge hoge
・ホームディレクトリを作らない
#adduser --system --ingroup hogehoge --no-create-home hoge
・ユーザーの削除
#deluser hoge
*ホームディレクトリは残ります。
・ホームディレクトリも同時に削除する。
#deluser --remove-home hoge
・ホームディレクトリも含む、関係する全てのファイルも同時に削除する。
#deluser --remove-all-files hoge
GroupとUserの設定 参照サイト ここから
ユーザー"hoge"で、サウンドデバイスを利用したい場合は、"hoge"を"audio"グループに含める必要があります。
/etc/groupを直接編集する場合は、以下のようになります。
audio:x:29:hoge,hoge2
*複数のユーザーを記述する場合は、カンマで区切ります。
コマンドを利用する場合は、
#adduser hoge audio
・ データベース
・ PHP言語
・ DNSサーバー
・ その他(運用について)
FAQ
-
tightvncserver でキーボード設定がおかしいので入力できない
このサイトで以下のコマンドを使って、GNONEのキーボードマッピングを新規(aa)に設定します。 ただし、日本語変換などは別途設定しないと動かないようです。 取り合えず英語モードでは使えました。
gconftool --set /desktop/gnome/peripherals/keyboard/kbd/layouts --type List --list-type String [aa]
-
sudoコマンドを実行すると、sudo: unable to resolve host ホスト名 というワーニングが表示
ホスト名の名前解決で問題がある場合が多いので、 /etc/hosts ファイルを編集します。
127.0.1.1 ホスト名.localdomain ホスト名.localdomain を
127.0.1.1 ホスト名.localdomain ホスト名 に修正します。
-
アップデイトでソースリストの取得に失敗する場合
/etc/apt/sources.List ファイルに以下のサイトから取得したサンプルを書き込み、アップデート
-
SECURITY information for xxx, unable to resolve host xxx などの警告が出る場合
/etc/hosts および /etc/resolv.conf でホスト名やドメイン名の設定が間違っている場合がありますので、修正します。
-
ユーザ追加するとコマンドヒストリーなどが使えない場合
Debian 6 の頃からのようですが、useraddコマンドで作成したユーザはコマンドヒストリが使えない、adduserコマンドで作成するとOKです。
-
aptコマンドで「壊れた変更禁止パッケージがあります」エラーにaptitudeで対処する
参考にしたサイト: http://minus9d.hatenablog.com/entry/2017/07/19/213801
aptitudeコマンドで、改善案を探しながら、一つ前のバージョンに戻ったり、その時の状況にあわせて、数回、繰り返すと、解決する場合があります。
-
aptコマンドで「以下のパッケージは保留されます」に対処する
参考にしたサイト: http://itengine.seesaa.net/article/454359986.html
sudo apt-get update
sudo apt-get upgrade
sudo apt-get -s dist-upgrade
sudo apt-get dist-upgrade
-
apt update コマンドで「Warning: apt-key is deprecated. Manage keyring files in trusted.gpg.d instead (see apt-key(8)).
/etc/apt/trusted.gpg」に対処する
参考にしたサイト: https://blog.serverworks.co.jp/could-not-update-due-to-apt-key-error https://qiita.com/tororoMeshi/items/07049c18f91d8eebcbdc https://gihyo.jp/admin/serial/01/ubuntu-recipe/0675
サードパーティーのAPTレポジトリパッケージを追加する時に使っていた「apt-key」コマンドは2020年8月の2.1.8から廃止予定になりました。そのため、警告がでます。
今回は、yarnレポジトリの場合で説明します。
現在のyarn GPG鍵を /etc/apt/trusted.gpg.d/ もしくは /usr/share/keyrings/ へエキスポートします。
- sudo apt-key list
- yarn のGPG鍵を確認 鍵のフィンガープリントの最後の8文字が鍵のIDになります。
- sudo apt-key export 鍵のID-8文字 | sudo gpg --dearmor -o /etc/apt/trusted.gpg.d/yarn.gpg
- sudo apt-key export 鍵のID-8文字 | sudo gpg --dearmor -o /usr/share/keyrings/yarn.gpg
yarn用のaptレポジトリの編集 /etc/apt/sources.list.d/yarn.list ファイルを編集し、エキスポートしたどちらかのyarn GPG鍵に書き換えます。
- sudo vim /etc/apt/sources.list.d/yarn.list
- deb [signed-by=/etc/apt/trusted.gpg.d/pubkey.gpg] https://dl.yarnpkg.com/debian/ stable main
- deb [signed-by=/usr/share/keyrings/pubkey.gpg] https://dl.yarnpkg.com/debian/ stable main
パッケージを更新
- sudo apt update
-
apt update コマンドで 「https://packages.sury.org/php/dists/bookworm/InRelease の取得に失敗しました 503 certificate has expired.......」に対処する
- apt-get clean
- apt-get update
clean を実行したところ、解決しました。但し、さまざまな要因があると思いますので、apt-get clean と apt-get autoclean を実行しても解決しないことがあるかも。
タグ:
オープンソースソフトウェア:
Apache
DebianのApacheについて
mod_rewriteのインストール
1)# a2enmod rewrite コマンドの実行
2).htaccessファイルの設定を有効にするために、 /etc/apache2/site-avaiable/default で使用するディレクトリで AlloOverride All に設定します。
その後Apache2に再起動 /etc/init.d/apache2 restart
仮想サイトの追加
環境 Debian GNU/Linux 4.0 以降
1) /etc/apache2/sites-avaiable にdefaultファイルを参考にして、追加するサイトの設定ファイルを作成します。
2) シンボリックリンク作成の代わりにDebianのApacheコマンドで追加作成、削除します。以下のコマンドは、 /etc/apache2/sites-enabled で実行します。
新規作成 "a2ensite サイト名" 削除の場合 "a2dissite サイト名"
3) Apacheの再読込 # /etc/init.d/apache2 reload
-
Apacheのデフォルトドメインを停止する(仮想ドメインを使う場合)
他の仮想ホストに干渉する可能性があるため、デフォルトの仮想ホストを無効にします。
sudo a2dissite 000-default.conf
Apacheモジュールの追加
新規作成 "a2enmod サイト名" サイト削除 "a2dismod サイト名"
mod_pagespeedを追加する場合:
Googleのmod_pagespeedサイトから最新版をダウンロード
dpkg -i mod-pagespeedモジュールファイル
もしくは
apt-get -f install mod-pagespeedモジュールファイル
確認で、/etc/apache2/mods-available と mods-enabled で pagespeed.conf pagespeed.load が設定されているか確認、もしくは e2enmod mod_pagespeed を実行して既にインストール済になっているか確認します。
その後、apache2を再起動
Apacheのログ
標準ログは、/var/log/apache2 に保存されます。 access.log error.log という名前になります。 リアルタイムで動作を調べるときには、 tail -f access.log -n 100 などでモニターでき、便利です。
.htaccessを使わない設定方法
.htaccess のファイル名を変更します。
/etc/apache2 にある apache2.conf で AccessFileName .htaccess という行を
コメントに設定する(読み込まないようにする)
/etc/apache2 にある httpd.conf に .htaccess の内容をコピーする。この
設定ファイルで、RewriteRuleなどを設定する。 なを、/etc/apache2/sites- avaiable/
以下の仮想ドメイン用の設定ファイルには、RewriteEngine ON を設定して下さい。
エラーが起きた場合
Apache2を起動時に、 using 127.0.0.1 for ServerName などのエラーメッセージが表示される場合は、/etc/apache2/apache2.conf の最後の行に、 ServerName hoge.hogedomain.com:80 を記入し、Apache2を再起動してエラーメッセージが表示されるか確認します。
DebianのOSを更新した際に、Apacheのアップデイトなど、関連ファイルが更新され、古い設定ファイルなどが残っている場合があります。 その場合は、以下のようなエラーメッセージが表示されることがあります。
apache2: Syntax error on line 140 of /etc/apache2/apache2.conf: Syntax error on line 1 of /etc/apache2/mods-enabled/php5.load: Cannot load /usr/lib/apache2/modules/libphp5.so into server: /usr/lib/apache2/modules/libphp5.so: cannot open shared object file: No such file or directory Action 'configtest' faile
このようなエラーの場合は、apacheの設定ファイルなどをバックアップし、その後、ディレクトリなども削除する apt-get --purge remove apache2 を実行します。
ディレクトリやファイルなどのインデックスを非表示にたい
Apache2の場合、 /etc/apache2/sites-available/default ファイルを修正し、apache2を再起動します。
修正箇所は、Options Indexes FollowSymLinks MultiViews の行で Indexes を削除します。
SSLの設定
サーバー内で証明書も発行する場合
参考にしたサイト: https://symfoware.blog.fc2.com/blog-entry-1120.html
環境 Debian 8,9
OpenSSLのインストールと設定
# apt-get install openssl
# cd /etc/ssl/certs/
# openssl genrsa -des3 -out server.key 2048
任意のパスフレーズを入力
Apacheの起動のたびに、パスフレーズの入力を求められので、削除します。
# openssl rsa -in server.key -out server.key
これで秘密鍵の準備は出来ました。今度はサーバー証明書を作成します。証明書要求の作成を行います。
# openssl req -new -days 3650 -key server.key -out server.csr
...... Common Name (e.g. server FQDN or YOUR name) []:192.168.1.3 <-www.example.comまたはIPアドレス
...... A challenge password []:(空白)
...... An optional company name []:(空白)
証明書を発行してもらうための要求ファイルができたので、証明書を発行
# openssl x509 -in server.csr -out server.crt -req -signkey server.key -days 3650
これでもう、server.csrは不要です。パーミッションを変更します。
# chmod 400 server.*
server.keyが秘密鍵。server.crtがサーバー証明書。
Apache2へSSLの設定
SSLモジュールの有効化
# a2enmod ssl
/etc/apache2/sites-available/default-ssl.conf を編集して、ServerNameと作成した秘密鍵、公開鍵のパスを指定。
# vi /etc/apache2/sites-available/default-ssl.conf
<IfModule mod_ssl.c>
<VirtualHost _default_:443>
ServerAdmin webmaster@localhost
ServerName 192.168.1.3:443 <-サーバー名もしくはIPアドレス
.......
# SSLCertificateFile directive is needed.
SSLCertificateFile /etc/ssl/certs/server.crt
SSLCertificateKeyFile /etc/ssl/certs/server.key
SSLサイトの有効化
# a2ensite default-ssl
Apache2再起動 # /etc/init.d/apache2 restart
パスワードを自動読み込みに設定する場合
/etc/ssl/private/ディレクトリに、例えばmy_passphrase.shファイルを作成します。
#!/bin/sh
echo "設定したパスワード"
管理者のみ実行権限付きパーミッションに変更
chmod 500 /etc/ssl/private/my_passphrase.sh
/etc/apache2/mods-available/ssl.confの修正
SSLPassPhraseDialog exec:/etc/ssl/private/my_passphrase.sh
Apache2再起動
参考にしたページ:
https://def-4.com/ssl-passphrase/
常時SSL化の設定
HTTPからHTTPSへのリダイレクト
参考にしたサイト: https://www.tecmint.com/redirect-http-to-https-on-apache/
https://www.yokoweb.net/2017/03/23/ubuntu-wordpress-ssl-coressl/
.htaccessファイルを使う場合
Mod Rewirte の実行 $ sudo a2enmod rewrite
使用するドメインルートディレクトリに.htaccess ファイルの作成し以下の設定を記載
RewriteEngine On
RewriteCond %{HTTPS} !=on
RewriteRule ^/?(.*) https://%{SERVER_NAME}/$1 [R,L]
もしくは
<IfModule mod_rewrite.c>
RewriteEngine on
RewriteCond %{HTTPS} !=on [NC]
RewriteRule ^(.*)$ https://%{HTTP_HOST}%{REQUEST_URI} [R=301,L]
</IfModule>
Apache2の再起動
仮想ドメインでSSLを運用
参考にしたサイト:
http://www.techspacekh.com/installing-and-configuring-apache-web-server-...
https://letsencrypt.jp/usage/#ExecClientSoftware
https://www.tecmint.com/install-free-lets-encrypt-ssl-certificate-for-ap...
https://qiita.com/ninneko/items/87a76f0f1dc6d82500fb
https://linux-svr.com/tips/Web%E3%82%B5%E3%83%BC%E3%83%90/12.php
-
Debian 8 jessie の場合
opensslで既にSSL(インストールされているサーバーで認証サーバーも兼用する)環境が設定ずみとして、
apacheのバーチャルホストの設定で
/etc/apache2/sites-available/www.XXXcom.conf のファイルを編集します。
VirtualHost *:443 以下を追加
<VirtualHost *:80>
ServerName www.XXX.com
DocumentRoot /var/www/html/xxx
ServerAlias XXX.com
CustomLog /var/log/apache2/xxx-80-access_log common
ErrorLog /var/log/apache2/xxx-80-error_log
<Directory "/var/www/html/xxx">
Options FollowSymLinks
AllowOverride All
Require all granted
</Directory>
</VirtualHost>
<VirtualHost *:443>
ServerName www.XXX.com
ServerAdmin [email protected]
DocumentRoot /var/www/html/xxx
ServerAlias xxx.com
CustomLog /var/log/apache2/xxx-443-access_log common
ErrorLog /var/log/apache2/xxx-443-error_log
<Directory "/var/www/html/xxx">
Options FollowSymLinks
AllowOverride All
Require all granted
</Directory>
SSLEngine on
SSLCertificateFile /etc/ssl/certs/server.crt
SSLCertificateKeyFile /etc/ssl/certs/server.key
</VirtualHost>
この状態だと、http と https の両方が稼働する状態なので、常時、httpsへ切り替わるように設定します。
httpからhttpsへリダイレクトする方法として、以下のようにhttpのタグにリライトを設定します。
<VirtualHost *:80>
<Directory ...>
................................
</Directory>
</VirtualHost>
-
Let's encryptで認証する場合(Debian 8 jessieの場合)
新しい設定ファイル /etc/apt/sources.list.d/backport.list を用意して,以下の内容を記述します。
deb http://ftp.debian.org/debian jessie-backports main
次に、Debianの更新 sudo apt update
jessie-backports から python-certbot-apacheをインストール
apt install python-certbot-apache -t jessie-backports
これで、certbotコマンドが実行できるようになります。
認証ファイルの作成 (www.xxxx.co.jp とxxxx.co.jpの2つのパターンに対応する)
sudo certbot certonly --webroot -w /var/www/html/xxxx -d www.xxxx.co.jp -d xxxx.co.jp
できた、cert.pem chain.pem fullchain.pem privkey.pem をApacheのファイルで設定します。
/etc/apache2/sites-available/www.xxxx.co.jp.conf のファイルに以下の項目を追加
SSLEngine on
SSLCertificateFile /etc/letsencrypt/live/www.xxxx.co.jp/fullchain.pem
SSLCertificateKeyFile /etc/letsencrypt/live/www.xxxx.co.jp/privkey.pem
SSLCertificateChainFile /etc/letsencrypt/live/www.xxxx.co.jp/chain.pem
最後に、自動更新の設定
sudo certbot renew
動作の確認は sudo systemctl |grep certbot
-
Let's encryptで認証する場合(Debian 9 stretchの場合)
参考にしたサイト:http://www.kmiura.net/archives/8801264.html
certbotのインストールとバージョンの確認
sudo apt-get update
sudo apt-get install -y certbot
sudo certbot --version
certbot 0.10.2
以下のコマンドを実行して、SSL認証ファイルを生成
certbot certonly --webroot -w /var/www/html -d www.XXXX.com -d XXXX.com
連絡先メールアドレスを設定、ライセンスの確認をすれば、SSL認証ファイルができます。
-
Let's encryptで認証する場合(Debian 10 Busterの場合)
Apacheの場合は https://certbot.eff.org/lets-encrypt/debianbuster-apache.html
インストール: sudo apt-get install certbot python-certbot-apache
証明書の発行: sudo certbot --apache -d www.gennai3.co.jp -d gennai3.co.jp
自動更新の設定: sudo certbot renew --dry-run
以下にインストールされます
/etc/crontab/
/etc/cron.*/*
systemctl list-timers
-
Let's encryptで wwwあり-> wwwなし で認証する場合(Debianの場合)
SSLなしのドメインの設定 一般的なApacheでの設定 www.xxx.jp.conf
######################################################################
# URL: http://www.xxx.jp/
######################################################################
<VirtualHost *:80>
    ServerName www.xxx.jp
    DocumentRoot /var/www/html/0000
    ServerAlias xxx.jp
    CustomLog /var/log/apache2/0000/xxx-80-access_log common
    ErrorLog /var/log/apache2/0000/xxx-80-error_log

<Directory "/var/www/html/0000">
                        Options FollowSymLinks MultiViews
                        AllowOverride All
                        Require all granted
                </Directory>
</VirtualHost>
このサイトがSSLなしで見れることを確認してから、sudo cetbot --apache コマンドを実行する
その際に、 www.xxx.jp と xxx.jp のどちらをSSL対応にするか確認があるので、xxx.jp を選択します。
www.xxx.jp.confファイルに以下の内容が追加されます。
RewriteEngine on
RewriteCond %{SERVER_NAME} =xxx.jp [OR]
RewriteCond %{SERVER_NAME} =www.xxx.jp
RewriteRule ^ https://%{SERVER_NAME}%{REQUEST_URI} [END,NE,R=permanent]さらに、SSL対応のファイルが追加されます。www.xxx.jp-le-ssl.conf
<IfModule mod_ssl.c>
<VirtualHost *:443>
    ServerName www.xxx.jp
    DocumentRoot /var/www/html/0000
    ServerAlias xxx.jp
    CustomLog /var/log/apache2/0000/xxx-80-access_log common
    ErrorLog /var/log/apache2/0000/xxx-80-error_log

<Directory "/var/www/html/0000">
                        Options FollowSymLinks MultiViews
                        AllowOverride All
                        Require all granted
                </Directory>

SSLCertificateFile /etc/letsencrypt/live/xxx.jp/fullchain.pem
SSLCertificateKeyFile /etc/letsencrypt/live/xxx.jp/privkey.pem
Include /etc/letsencrypt/options-ssl-apache.conf
</VirtualHost>
</IfModule>
-
CertbotコマンドでApacheのLet's encrypt認証書を取得する場合(Debian 11 bullseyeの場合)
$ sudo certbot --apache --agree-tos --redirect --hsts --staple-ocsp --email [email protected] -d www.example.com
--apache: Use the Apache plugin.
--agree-tos: Agree to terms of service.
--redirect: Force HTTPS by 301 redirect.
--hsts: Add the Strict-Transport-Security header to every HTTP response. Forcing browser to always use TLS for the domain. Defends against SSL/TLS Stripping.
--staple-ocsp: Enables OCSP Stapling. A valid OCSP response is stapled to the certificate that the server offers during TLS.
-
PostfixのTLSで使用するLet's encryptで認証書だけを取得する場合(Debian 11 bullseyeの場合)
$ sudo certbot certonly -a apache --agree-tos --no-eff-email --staple-ocsp --email 名前@gmail.com -d mail.ドメイン名.biz
Saving debug log to /var/log/letsencrypt/letsencrypt.log
Account registered.
Requesting a certificate for mail.ドメイン名.biz
Successfully received certificate.
Certificate is saved at: /etc/letsencrypt/live/mail.ドメイン名.biz/fullchain.pem
Key is saved at: /etc/letsencrypt/live/mail.ドメイン名.biz/privkey.pem
certonly: TLS 証明書を取得しますが、Web サーバーにはインストールしません。
-a nginx: 認証に Apache プラグインを使用する
--agree-tos: 利用規約に同意します。
--no-eff-email: EFF財団からのメールを受け取りません。
--staple-ocsp: OCSP ステープルを有効にします。有効な OCSP 応答は、TLS 接続中にサーバーが提供する証明書にステープルされます。
--email: 重要な通知とアカウントの復旧に使用するメール アドレスを入力します。
-d: ドメイン、つまりメール サーバーのホスト名。
-
Apacheのデフォルトドメインを停止する(仮想ドメインを使う場合)
他の仮想ホストに干渉する可能性があるため、デフォルトの仮想ホストを無効にします。
sudo a2dissite 000-default.conf
-
Certbotの証明書再発行を自動化
crontabに毎日certbot renew を実行し、postfixとdovecot を再起動、Apacheの場合
sudo crontab -e
@daily certbot renew --quiet && systemctl reload postfix dovecot apache2
-
Certbotの証明書を削除
登録されている証明書の確認
sudo certbot certificates
証明書の削除
sudo certbot delete --cert-name 登録ドメイン名
証明書を失効し削除する場合(deleteコマンドは失効しないので)
sudo certbot revoke --cert-path /etc/letsencrypt/live/登録ドメイン名/cert.pem
削除・失効後は、ApacheやNginxの設定も変更します。参考にしたサイト:https://weblabo.oscasierra.net/letsencrypt-revoke/
-
Certbotの証明書の取得や再発行で失敗する場合
新規登録時に証明書の発行や再発行するときにエラーが起こった場合は、--debug-challenges オプションを追加するとエラーが解消することがあります。参考にしたサイトは https://qiita.com/pluser/items/f9a2492d3b1d797fbac4
sudo certbot --apache --debug-challenges -v
sudo certbot renew --debug-challenges -v
Basic認証の設定
オープンソースCMS Drupalの運用環境で、Basic認証を設定する場合
apache2のhtpasswdを追加インストール
# aptitude -y install apache2-utils
認証ユーザー名とパスワードを設定します。パスワードファイル(.htpasswd)は/etc/apache2に保存する場合
# htpasswd -c /etc/apache2/.htpasswd ユーザー名
Drupalのdrupal_rootディレクトリにある、.htaccessファイルのトップ行に以下の内容を追記します。
AuthUserFile /etc/apache2/.htpasswd
AuthName "Input ID and Password."
AuthType Basic
Require valid-user
<Files ~ "^.(htpasswd|htaccess)$">
Require all denied
</Files>
Apache2を再起動。
リバースプロキシーの設定
Debian12のApache2で動作検証しました。SSL対応は未検証です。 参考:https://rainbow-engine.com/apache-reverseproxy-howto/
参考: https://www.softel.co.jp/blogs/tech/archives/5465
mod_proxy と mod_proxy_http を有効化する sudo a2enmod proxy proxy_http
/home/www/html/work 以下のディレクトリにCMSなどをインストールして、仮想ディレクトリで運用する場合です。社内開発用サーバーでの運用。
http://debian1xxxx にアクセスすると、/home/www/html/work/ 以下のCMSなどが起動します。
<VirtualHost *:80>
    DocumentRoot /home/www/html/work
    ServerName debian1xxxx
    ServerAdmin xxx@xxxxx
    ErrorLog /var/log/apache2/debian1/debian1xxxx.error.log
    CustomLog /var/log/apache2/debian1/debian1xxxx.access.log combined
    ProxyRequests Off

     <Directory /home/www/html/work>
        Options Indexes FollowSymLinks MultiViews
        AllowOverride All
        Require all granted
        Allow from 192.168.0
     </Directory>

        ProxyPass /work  http://debian1xxxx/
        ProxyPassReverse /work  http://debian1xxxx/

</VirtualHost>
参考まで < 以下の設定は動作未検証です。>
出典: https://docs.graylog.org/docs/web-interface#configuring-webif-nginx
HTTPの場合
<VirtualHost *:80>
    ServerName xxx.example.org
    ProxyRequests Off
    <Proxy *>
        Order deny,allow
        Allow from all
    </Proxy>

    <Location />
        RequestHeader set X-xxx-Server-URL "http://xxx.example.org/"
        ProxyPass http://127.0.0.1:9000/
        ProxyPassReverse http://127.0.0.1:9000/
    </Location>

</VirtualHost>
HTTPSの場合
<VirtualHost *:443>
    ServerName xxx.example.org
    ProxyRequests Off
    SSLEngine on
    # <- your SSL Settings here!

    <Proxy *>
        Order deny,allow
        Allow from all
    </Proxy>

    <Location />
        RequestHeader set X-xxx-Server-URL "https://xxx.example.org/"
        ProxyPass http://127.0.0.1:9000/
        ProxyPassReverse http://127.0.0.1:9000/
    </Location>

</VirtualHost>
タグ:
Command
Debian コマンド
良く使う、代表的なDebianコマンドについて
dpkg コマンド
パッケージの情報を参照 dpkg -s <パッケージ名>
インストール済み dpkg -L <パッケージ名>
インストールされているパッケージを参照 dpkg -l | grep <検索>
パッケージのインストール dpkg -i <パッケージ名>
apt コマンド
OS・パッケージの更新情報取得 apt-get update
OS・パッケージの更新 apt-get upgrade
インストール済みパッケージの更新チェック apt-get check
パッケージのインストール apt-get install <パッケージ名>
削除 apt-get remove <パッケージ名>
パッケージの依存関係を修復する場合 apt-get -f install
パッケージの検索 apt-cache search <検索対象>
ディストリビューションのアップグレード apt-get dist-upgrade
キャッシュの削除 /var/cache/apt/archives 以下のパッケージを削除 apt-get clean apt-get autoclean
apt ソースリスト /etc/apt/sources.list
aptコマンド実行で保留がある場合は
apt-get update
apt-get dist-upgrade
で保留もアップデイトされます。
aptitude コマンド
パッケージのインストール aptitude -y install パッケージ名
パッケージの検索 aptitude search パッケージ名
パッケージ情報を参照 aptitude show パッケージ名
パッケージを削除 aptitude remove パッケージ名
パッケージの設定ファイルも含めて削除 aptitude purge パッケージ名
データベース更新 aptitude update
データベース更新後にパッケージの更新 aptitude safe-upgrade
sudo コマンド
/etc/sudoers を編集、もしくは visudo コマンドを実行して編集します。
設定方法は、 ユーザー名 ホスト名=(コマンド実効ユーザー) コマンド
例えば、user1 にすべてのコマンドを実効させる場合は
user1 ALL=(ALL) ALL になります。
update-alternatives コマンド
Javaのバージョンを入れ替える時に使用します。
# update-alternatives --config java
PHPのバージョンを入れ替える時には、例えば PHP7.4に切り替えるときは、
# update-alternatives --set php /usr/bin/php7.4
もしくは 以下のコマンドで切り替え環境を選択できます。
sudo update-alternatives --config php

alternative php (/usr/bin/php を提供) には 8 個の選択肢があります。

  選択肢    パス           優先度  状態
------------------------------------------------------------
  0            /usr/bin/php8.1   81        自動モード
  1            /usr/bin/php5.6   56        手動モード
  2            /usr/bin/php7.0   70        手動モード
  3            /usr/bin/php7.1   71        手動モード
  4            /usr/bin/php7.2   72        手動モード
  5            /usr/bin/php7.3   73        手動モード
* 6            /usr/bin/php7.4   74        手動モード
  7            /usr/bin/php8.0   80        手動モード
  8            /usr/bin/php8.1   81        手動モード

現在の選択 [*] を保持するには <Enter>、さもなければ選択肢の番号のキーを押してください:
タグ:
オープンソースソフトウェア:
SMTP
SMTP
DebianでSMTP(メール送信)サーバーの設定
exim4
Debian 10 などで標準インストールされるシンプルなSMTPサーバーです。
Debianサーバーで、crontab などと連携してシステム上のアラームメッセージなどを自動送信させるために、exim4を使ってみました。
インストールと設定
参考にしたサイト:
http://mirahouse.jp/n10/blog/2015/debian-exim4/
https://www.bnote.net/kuro_box/kuro_debian_exim4.shtml
rootで dpkg-reconfigure exim4-config を実行
General type of mail configuration: mail sent by smarthost; received via SMTP or fetchmail
System mail name:サーバのFQDN
IP-addresses to listen on for incoming SMTP connections:127.0.0.1 ; ::1
Other destinations for which mail is accepted:サーバのFQDN
Machines to relay mail for:(blank)
IP address or host name of the outgoing smarthost:送信させる外部のsmtpサーバー::587
Hide local mail name in outgoing mail? <Yes>
Visible domain name for local users:サーバのFQDN
Keep number of DNS-queries minimal (Dial-on-Demand)? <No>
Delivery method for local mail:mbox format in /var/mail/
Split configuration into small files? <No>
外部の転送先アカウント設定
/etc/exim4/passwd.client を編集
外部のSMTPサーバー名:そのメールアドレス:パスワード
sudo chown root:Debian-exim /etc/exim4/passwd.client
sudo chmod 640 /etc/exim4/passwd.client
必要であれば、システム内部のメールを転送するために、 /etc/email-addresses も設定します。
システムへの反映 update-exim4.conf
これで、コマンドラインから mail コマンドで送信できます。送信テストコマンドのサンプル
echo "test" | mail -s "test1" (送信先のメールアドレス)
タグ:
オープンソースソフトウェア:
SSH
Debianインストール後、SSHを設定する方法
参考: << www.linux.net-japan.info/install04.html >>
SSHサーバの設定
sshd_configの設定
/etc/ssh/sshd_configファイルを設定する。
設定方針:指定したユーザのみが、SSHサーバに接続できるように設定する。
vim /etc/ssh/sshd_config
PermitRootLogin no
AuthorizedKeyFile %h/ .ssh/authorized_keys
DenyUsers ALL
AllowUsers etch taro hanako
2) TcpWrapperの設定
/etc/hosts.allowと/etc/hosts.denyファイルで、SSH接続できるネットワーク又はIPアドレスを指定する。
TCPのパッケと段階でもアクセス制限を行う。この場合は、内部のプライベートネットワークからの接続を許可している。
vim /etc/hosts.allow
ALL: 127.0.0.1
sshd: 192.168.1.
vim /etc/hosts.deny
sshd: ALL
3) sshd_configの設定変更を有効にする
/etc/init.d/ssh restart
SSH(公開鍵と秘密鍵の作成)
ssh-keygen -t rsa を実行します。
ssh-keygen -t rsa
Generating public/private rsa key pair.
Enter file in which to save the key (/Users/xxxxx/.ssh/id_rsa):
/Users/xxxxx/.ssh/id_rsa already exists.
Overwrite (y/n)? yes
Enter passphrase (empty for no passphrase):
Enter same passphrase again:
Your identification has been saved in /Users/xxxxx/.ssh/id_rsa.
Your public key has been saved in /Users/xxxxx/.ssh/id_rsa.pub.
The key fingerprint is:
SHA256:Dqvvyxxxxxxxxxxxxx [email protected]
The key's randomart image is:
+---[RSA 2048]----+
| .o . . |
| o.=.xxxxxxx
| oxxxxxxxxx
| xxxxxxxx
| . . xxxxxxxxxxxx
|. . ...=+ . ... .|
|. . ..xxxxxxxxxxxxx
| . . o o . |
| .xxxxxxxxxxxx
+----[SHA256]-----+
よくある現象
SSH接続時に以下のようなエラーが出た時
@@@@@@@@@@@@@@@@@@@@@@@@@@@@@@@@@@@@@@@@@@@@@@@@@@@@@@@@@@@
@ WARNING: REMOTE HOST IDENTIFICATION HAS CHANGED! @
@@@@@@@@@@@@@@@@@@@@@@@@@@@@@@@@@@@@@@@@@@@@@@@@@@@@@@@@@@@
IT IS POSSIBLE THAT SOMEONE IS DOING SOMETHING NASTY!
Someone could be eavesdropping on you right now (man-in-the-middle attack)!
It is also possible that a host key has just been changed.
The fingerprint for the RSA key sent by the remote host is
SHA256:wASxKs7rxxxxxxxxxxxxxxxxxxxxxxxxxxxxx xxxxx
Please contact your system administrator.
Add correct host key in /Users/xxxxxxx/.ssh/known_hosts to get rid of this message.
Offending RSA key in /Users/xxxxxxx/.ssh/known_hosts:4
RSA host key for 192.168.0.8 has changed and you have requested strict checking.
Host key verification failed.
このワーニングの原因は、接続先ホストを再インストールしたり、SSHサーバーの設定が変更になった場合などで接続できない状態になっているからです。
一つの方法として、known_hosts の設定情報を削除する方法です。 ssh-keygen -R 接続ホスト名
ssh-keygen -R 192.168.0.8
# Host 192.168.0.8 found: line 4
/Users/xxxxx/.ssh/known_hosts updated.
Original contents retained as /Users/xxxxx.ssh/known_hosts.old
SSH接続の確認
ssh hodota$ ssh -l hodota 192.168.0.8
The authenticity of host '192.168.0.8 (192.168.0.8)' can't be established.
ECDSA key fingerprint is SHAxxxxxxxxxxxxxxxxxxxxxxxxxxxxxxxxxxxxxxxxxx.
Are you sure you want to continue connecting (yes/no)? yes
Warning: Permanently added '192.168.0.8' (ECDSA) to the list of known hosts.
[email protected]'s password:
The programs included with the Debian GNU/Linux system are free software;
the exact distribution terms for each program are described in the
individual files in /usr/share/doc/*/copyright.
Debian GNU/Linux comes with ABSOLUTELY NO WARRANTY, to the extent
permitted by applicable law.
Last login: Sun Jan 17 12:08:21 2016 from xxxxxxxx.xxxxxxx
詳細はここを参考に
オープンソースソフトウェア:
dns
DNS(Domain Name System)について
Debianでの設定について、簡単に注意することをまとめました。
詳細は 「実践 Debian GNU/Linuxサーバー ルート養成講座」 (秀和システム) という本がわかりやすく、良いと思います。
プライマリ
Bind 9 のchroot化について
https://wiki.debian.org/Bind9#Bind_Chroot
DebianでBind 9 を稼働させるときにchroot化したいと思います。そこで、以下のサイトの手順を参考に設定しました。
http://www.mk-mode.com/octopress/2013/10/18/debian-7-dns-chroot/
Debian 7 と Debian 8 でインストールテストしました。
- Bind 9 をインストールし、停止する
aptitude -y install bind9 bind9utils dnsutils
- chrootディレクトリは /var/bind9/chroot
起動オプションの編集 /etc/default/bind9
#OPTIONS="-u bind -4"
OPTIONS="-u bind -4 -t /var/bind9/chroot"
chrootディレクトリ作成
mkdir -p /var/bind9/chroot/{etc,dev,var/cache/bind,var/run/named}
chroot化で必用なスペシャルファイルの作成、パーミッション
mknod /var/bind9/chroot/dev/null c 1 3
mknod /var/bind9/chroot/dev/random c 1 8
chmod 660 /var/bind9/chroot/dev/{null,random}
元のBindディレクトリをchrootへ移動
mv /etc/bind /var/bind9/chroot/etc
シンボリックリンクの作成
ln -s /var/bind9/chroot/etc/bind /etc/bind
オーナー、グループ、パーミッション変更
chown -R bind:bind /etc/bind/*
chmod 775 /var/bind9/chroot/var/{cache/bind,run/named}
chgrp bind /var/bind9/chroot/var/{cache/bind,run/named}
起動スクリプトの編集 /etc/init.d/bind9 PIDファイルのパス変更
PIDFILE=/var/bind9/chroot/var/run/named/named.pid
rsyslogにログ出力するように変更
echo "\$AddUnixListenSocket /var/bind9/chroot/dev/log" > /etc/rsyslog.d/bind-chroot.conf
syslogdの再起動
/etc/init.d/rsyslog restart
Bind9の再起動
/etc/init.d/bind9 start
セカンダリ
マスターサーバと同じようにBind9をインストールし、ゾーンファイルのディレクトリを作成します。
mkdir -p /etc/bind/zones/slave

chown -R bind:bind /etc/bind/zones
/etc/bind/named.conf.local ファイルの編集
zone "example.jp" {

type slave;

file "/etc/bind/zones/slave/example.jp.zone#;

masters {xxx.xxx.xxx.xxx;};

};
必用なドメイン名とそのゾーンファイルを定義して、Bind 再起動。
スレーブ・サーバの動作確認
dig @スレーブサーバIPアドレス a www.example.jp +short
SPFレコードの設定
- Bind9などのDNSシステムでの一般的な設定方法として
使用するドメイン名.com TXT 3600 v=spf1 +ip4:(メールサーバーと設定したIPドレス) ~all
xxxxxx.com TXT 3600 v=spf1 +ip4:202.1xx.xxx.xxx ~all
上記設定でお名前ドットコムサイトでのDNS設定でSPF設定はOKでした。2021年2月の時点で。
一つのドメインに複数のSPFレコードを記述する際には、一行で記述します。
例: example.jp. IN TXT "v=spf1 +ip4:192.168.10.0/24 +ip4:10.1.2.0/24 ~all"
メールサーバーを持っているドメインの場合
例: example.jp. IN TXT "v=spf1 include:_spf.google.com +ip4:202.212.xxx.xxx/29 mx ~all"
- SPFレコードの検証サイト: https://www.kitterman.com/spf/validate.html
- SPFレコードのチェックサイト: https://dmarcian.com/spf-survey/
備考
DNS機能が正常かどうか確認する方法は、いくつかありますが、Webサイトでの確認する方法として、http://dnscheck.iis.se/ というサイトを使っております。 シンプルです。 そのほかにもたくさんサイトがありますが、信頼できそうなサイトを利用しましょう。
FAQ
- ゾーンファイルの設定確認方法(Debian11)
/usr/sbin/named-checkzone example.com /etc/bind/example.com.zonefile
- named.confの設定確認方法(Debian11)
/usr/sbin/named-checkconf /etc/bind/named.conf
タグ:
オープンソースソフトウェア:
その他
Debian運用での話題
Debianを運用していて必要となるさまざま話題について。
HDDのマウント設定
HDDをフォーマットして、mountコマンドで動作確認して、
mount /dev/sdb1 /home/s1
問題なければシステム起動時に自動マウントさせるためには、/etc/fstab ファイルに設定します。 たとえば、
/dev/sdb1 /home/s1 ext3 defaults 0 0
次のWebサイトの情報を参考にしました ここから
HDDの消去コマンド
10MBのブロックサイズでゼロを書き込む # dd if=/dev/zero of=/dev/hda bs=10MB
もしくは 乱数を2回書き込んだ後,ゼロフィルを実行 # shred -n 2 -z /dev/hda
HDDの修復コマンド(fsck)
HDDを修復する方法
起動中のHDDはfsckコマンドで修復できません。アンマウントして修復できるような環境で実行します。
ディスクの確認 # fdisk -l
HDDのアンマウント # umont /dev/xxxx (デバイス名)
修復 # fsck -v -y /dev/xxxx (デバイス名)
VNCサーバー
vnc4serverをインストールする場合
1)apt-get install vnc4server もしくは aptitude -y install vnc4server
2) /etc/vnc.conf を新規作成し、以下の設定を追加
$geometry = "2048x1024";
$depth = "24";
3) suになるか sudoコマンドでVNCパスワード作成
vncpasswd
4) .vnc/xstartup に Gnomeセッションの起動スクリプト追加
exec gnome-session &
5) VNCサーバーの起動 vncserver :1 停止 vncserver -kill :1
Debian 8 (jessie)の場合、GNOMEではVNCサーバーに接続エラーが起きるので、GUI環境をGNOME2ベースのMateを使用します。
詳細は ここを参照
XRDPをインストールする場合
Debian 9 Stretch GNOMEデスクトップ もしくは Mateデスクトップ
最初に xserver-xorg-legacy を削除するとGNOMEでもXRDPが実行できました。バグのようですが、詳細は、https://unix.stackexchange.com/questions/389005/using-xrdp-without-local... にて。
# apt-get purge xserver-xorg-legacy
# apt -y install xrdp
# systemctl start xrdp
# systemctl enable xrdp
Windowsのリモートデスクトップ接続で、セッションに [Xvnc] を選択し、ユーザー名とパスワードを入力し接続します。
Debian 10 Buster の場合、GNOME環境をtaskselで選択インストールすると、サスペンドやスリープなどのPC環境をサポートする機能も含めてインストールされ、サーバーとして使うには、20分ぐらいで電源が落ちたり、不要な機能がありましたので、taskselコマンドで、デスクトップ環境、GNOME環境をアンインストールして、再起動後に、taskselコマンドで、デスクトップ環境とMateだけを選択してインストールしてから再起動します。
その後、xrdpをインストールしてもつながらない場合は、 ここを参考に https://www.hiroom2.com/2017/06/19/debian-9-xrdp%E3%82%92%E3%82%A4%E3%83%B3%E3%82%B9%E3%83%88%E3%83%BC%E3%83%AB%E3%81%99%E3%82%8B/#sec-1
「could not acquire name on session bus」のエラーが表示される場合は、/etc/xrdp/startwm.sh を編集します。
exec mate-session (これを挿入)
test -x /etc/X11/Xsession && exec /etc/X11/Xsession (これは元から)
exec /bin/sh /etc/X11/Xsession (これは元から)
起動時に「Could not acquire name on session bus」が表示される場合は、mate-sessionの起動前に
unset DBUS_SESSION_BUS_ADDRESS
を挿入してXRDPを再起動して改善しました。 詳細は http://verifiedby.me/adiary/0126
Debian 10 での設定サンプル /etc/xrdp/startwm.sh
最後の行あたりは、以下のように設定します。
unset DBUS_SESSION_BUS_ADDRESS
exec mate-session
test -x /etc/X11/Xsession && exec /etc/X11/Xsession
exec /bin/sh /etc/X11/Xsession
ネットワークコマンド
digコマンドやnslookupコマンドが使えない場合は、追加インストールします。
- apt-get install net-tools
- apt-get install dnsutils
ファイル転送
rcp コマンド
リモートホストからローカルホストへコピー
リモートホストの「example.com」にユーザー名「user1」でログインし、「file1」というファイルをローカルホストへ「file2」という名前でコピー
- rcp [email protected]:/home/user1/file1 file2
リモート間でファイルのコピー
- rcp [email protected]:/home/user1/file1 [email protected]:/home/user2/file2
オプション
- -p コピー元の更新日時、アクセス権の情報もコピーする
- -r コピー元のディレクトリ内のファイルをすべてコピーする
scp コマンド
暗号化してファイル転送
scp [オプション] コピー元 コピー先
主なオプションは
- -C 通信を圧縮する
- -i 秘密鍵ファイル RSAまたはDSA認証の秘密鍵ファイルを指定する
- -P ポート番号 ポート番号を指定する
- -p オリジナルファイルの更新時間とモードを維持する
- -r ディレクトリ内を再帰的にコピーする
- -v プログレス情報を表示する
- -1 SSH1を使用する
- -2 SSH2を使用する
- -4 IPv4を使用する
- -6 IPv6を使用する
リモートホストからローカルにファイルをコピー、ひとつのファイル「/home/user/file1」をコピー
- scp [email protected]:/home/user/file1 ~/tmp
ローカルからリモートホストにファイルをコピー
scp コピー元ファイル ユーザ名@リモート・ホスト名:/リモート先のPATH
- scp ~/tmp/file1 [email protected]:/home/user/tmp/
リモートホストから別のリモートホストにファイルをコピー
scp [email protected]:/home/user/tmp/file1 [email protected]:/home/user/tmp/
パーティションの変更
HDDのDiskからDiskへのコピーなどでパーティションサイズを拡大させたい、結合させたいときに、Gpartedプログラムを使います。
Diskに未割当の領域があり、それを、既存のパーティションに結合させる手順
- 作業は、LiveLinuxか別のLinuxにHDDを接続して、ブートOSではないHDD状態で作業します。
- Gpartedを起動して、該当するHDDを選択
- Extendedの拡張領域を拡大、全域(できれば若干余裕領域を残す)にすることで未割当領域を拡張領域に含める
- スワップ領域を最後(未割当の後)に移動させる
- Extendedの拡張領域をスワップサイズに縮小、スワップの後の空き領域がゼロ(0)にする
- 既存パーティションを選択して、リサイズする、拡大させt、前方と後方がともにゼロ(0)にする
- これで既存パーティションが拡大
パーティション変更を実行(保留を実行)させると、Linuxブートなどのワーニングが表示されますが、とりあえず実行します。
詳細は ここ を参考にしました
Debian パッケージのインストールツール
tasksel コマンド GUI環境や初期デスクトップ環境をインストール・アンインストールするのに便利です。
PINGでサーバーの監視スクリプト
参考にしたサイト: https://qiita.com/nkojima/items/e9a851e40ef8e2af9993
#!/bin/bash
IP_LIST=(172.17.12.143 172.17.11.130 172.17.15.81 172.17.15.82)
MAILTO='送信先のメールアドレス'
LOG_FILE=./ping.log
for ip in ${IP_LIST[@]}
do
ping_result=$(ping -w 5 $ip | grep '100% packet loss')
date_result=$(date)
if [[ -n $ping_result ]]; then
echo "[SEVERE] server inactive: $ip $date_result" >> $LOG_FILE
echo $ip | mail -s "[ALERT] server down!! $date_result" $MAILTO
else
echo "[INFO] server active: $ip $date_result" >> $LOG_FILE
fi
done
オープンソースソフトウェア:
Linux command
良く使うLinuxコマンドを中心に説明します
例えば、 grep cp tar yum
dig
概要: ドメイン情報を指定したDNSサーバーから取得する
オプション:
@の後にDNSサーバーのドメイン名もしくはIPアドレス
ドメイン名の後に 検索タイプ a, any, mx, ns, soa, hinfo, axfr, などを指定できる
たとえば dig @000.000.000.000 company.co.jp mx
- TXTレコード(SPFレコード)の確認
dig -t TXT <ドメイン名>
- IPアドレスに対応するドメイン名を調べる、逆引きの場合
dig -x IPアドレス
- Question Section とコメントを非表示
dig <ドメイン名> +noques +nocomments
- 最後に表示される統計情報を非表示
dig <ドメイン名> +nostats
- IPアドレスだけ表示
dig <ドメイン名> +short
- すべてのリソースレコードを取得表示
dig -t ANY <ドメイン名>
- DNSで返答するキャッシュDNSサーバーを調べる
dig <ドメイン名> +short +identify
- 権威DNSサーバーを調べる
dig <ドメイン名> +nssearch
- 見やすい表示
dig -t SOA <ドメイン名> +multiline
- 権威DNSサーバーに問い合わせして調べる
dig @IPアドレス <ドメイン名> +norecurse
- キャッシュDNSサーバーになって、非再帰問い合わせをして名前解決する
dig -t NS .
- DNS問い合わせをトレースする
dig <ドメイン名> +trace
getent
システム管理環境で使われているデータベースから指定したキーワードを検索します。
例えば getent passwd ユーザ名 ユーザ名のパスワード検索
※ Linuxコマンドで、参考にしているサイトは、
「日経ITpro 言語・コマンドリファレンス」
ほか
tar
Debianのtarコマンド:
アーカイブを作成する際に、あるディレクトリやファイルをアーカイブ作成時に除外したい場合は、--exclude='./ディレクトリ名' で実行します。 *.mp4 のような使い方も可能。
tar cvzf sample.tar.gz --exclude=./sample/test/*.mp4 ./sample
tar cvzf sample.tar.gz --exclude=./sample/test/* ./sample
tar cvzf sample.tar.gz --exclude={./sample/test/*.mp4, ./sample/test/*.jpg,} ./sample
OS info
OSのバージョンやカーネルなどのバージョン・システム情報を調べる方法
Linux version 2.6.18-194.26.1.el5 ([email protected]) (gcc version 4.1.2 20080704 (Red Hat 4.1.2-48)) #1 SMP Tue Nov 9 12:54:20 EST 2010
# cat /proc/version
Linux version 2.6.18-194.26.1.el5 ([email protected]) (gcc version 4.1.2 20080704 (Red Hat 4.1.2-48)) #1 SMP Tue Nov 9 12:54:20 EST 2010
# cat /etc/redhat-release
CentOS release 5.5 (Final)
# cat /etc/issue
CentOS release 5.5 (Final)
Kernel \r on an \m
# yum list installed | grep "centos-release*"
centos-release.x86_64 10:5-5.el5.centos installed
centos-release-notes.x86_64 5.5-0 installed
# rpm -qa | grep "centos-release*"
centos-release-5-5.el5.centos
centos-release-notes-5.5-0
# uname --kernel-release
2.6.18-194.26.1.el5
[root@yuu210 ~]#
# uname --help
Usage: uname [OPTION]...
Print certain system information. With no OPTION, same as -s.
-a, --all print all information, in the following order,
except omit -p and -i if unknown:
-s, --kernel-name print the kernel name
-n, --nodename print the network node hostname
-r, --kernel-release print the kernel release
-v, --kernel-version print the kernel version
-m, --machine print the machine hardware name
-p, --processor print the processor type or "unknown"
-i, --hardware-platform print the hardware platform or "unknown"
-o, --operating-system print the operating system
--help この使い方を表示して終了
--version バージョン情報を表示して終了
# uname --all
Linux yuu210.yuuyake.biz 2.6.18-194.26.1.el5 #1 SMP Tue Nov 9 12:54:20 EST 2010 x86_64 x86_64 x86_64 GNU/Linux
GNU/Linux
x86_64 GNU/Linux
Linux 2.6.18-194.26.1.el5 #1 SMP Tue Nov 9 12:54:20 EST 2010
Linux
2.6.18-194.26.1.el5
hostname
rpm
RPMコマンドについて
# rpm -i 新規にインストール
# rpm -U アップグレードのとき(既存がなくても)
# rpm -F アップグレード(既存のRPMがある場合)
# rpm -e 削除
# rpm -ev --nodeps 依存関係も強制的に削除する場合
# rpm --rebuild ソースから再構成
# rpm -vh 表示
# rpm -q インストールされているか確認
# rpm -qi 詳細情報
# rpm ---version バージョン
# rpm --help ヘルプ など
オープンソースソフトウェア:
yum
Linuxコマンドのyumについて、良く使う機能を説明します。
★コマンドの概要 RedHat系のOSで使われていたRPMパッケージを管理するコマンドで、現在は他のLinux系OSでも動作可能です。RPMパッケージのインストール、アップデイトなど、管理するのに最適です。RPMコマンドよりも馴染みやすい感じが良い点だと思います。
★良く使う事例
check-update アップデイト可能なRPMパッケージを参照表示
clean (clean all) ダウンロードした古いパッケージや情報を削除
info 利用できるパッケージの情報
install インストール パッケージ指定も可
list installed インストール済みパッケージ表示
list updates アップデイトできるパッケージ表示
provides パッケージ名 パッケージ内のファイル一覧
remove 削除 パッケージ指定も可
update アップデイトできるものを更新 パッケージ指定も可
★64ビット環境でインストールしたが、32ビットRPMも含まれる場合、以下の手順でクリーニングして、64ビット環境としてアップデイトする、手順です。
まずインストール済みの32ビットRPMを表示 yum list installed *.i386
32ビットRPMを削除 yum remove *.i386
アップデイト可能な64ビットRPMを表示確認 yum list updates
その後 アップデイト実行 yum update
削除について
もし依存関係でパッケージを削除できない場合は
rpm -ev --nodept パッケージ名
Mac OS X
Macintosh OS X に関するさまざまな話題
Tips < 便利な機能や使い方 >
・ キーボードでプリントスクリーン(画面のハードコピー)操作について
・ ディスプレイを繋げてミラーリングモードに切り替えるショートカット
ミラーリングモードに切り替えるキーボードショートカット: Command + F1
・ Active Directory に参加する場合
環境設定
・ 共有ディレクトリ(WindowsやSambaのSMBサービス)に接続する場合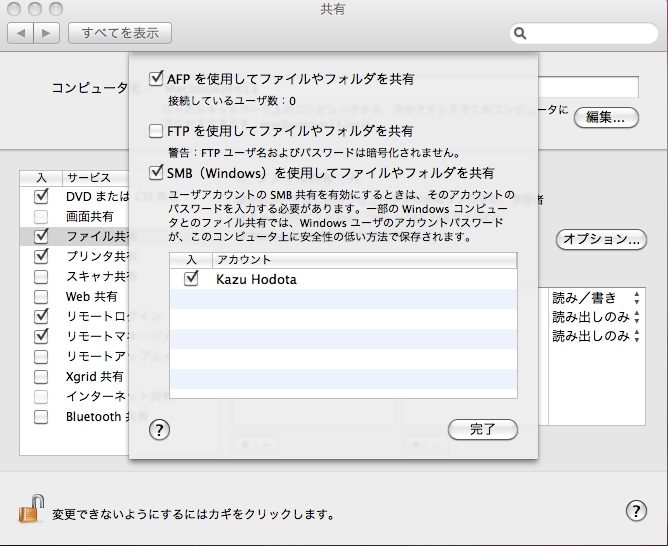
MacBook PRoの起動トラブル
起動時のHDDをチェックしてブートする方法
電源を押して、シフトキーをしばらく押す、その後、HDDチェックバー表示、その後、せーフモードで起動した状態となる。
番外編 Macハードウェアについて
・ Macbookの内蔵電源(バッテリー)を時々空にして、再充電リフレッシュをしましょう。 ACパワーケーブルを抜いて使っていて、バッテリが空になると自動的にスリープ休止状態になります。その後、ACパワーケーブルを接続して、ある程度充電し始めてから(おおよそ5-6分程度)、Macbookの電源ボタンを押して、スリープ状態から復帰しましょう。 ACパワーケーブルを接続して、すぐに電源ボタンを押した場合は、スリープから復帰する途中で、フリースすることがありました。 たぶん、バッテリーが未充電状態だと認識したのかもしれません。
・ Mac OS Xシステムの更新作業が更新作業待ちの状態になると、しばらくするとネットワーク機能が使えない状態になり、OSのアップデイトを行って、再起動後に正常にネットワーク機能が使えるようになる現象があります。 OSのアップデイト内容により、必ず起きる現象ではありません。
・ Macbook pro 13 Mac OS X でスリープ設定にし、そのスリープ設定開始時間前に、手動でスリープ設定にした場合、もともと設定したスリープ設定の解除時間が過ぎたあと、パワーボタンを押してもスリープ状態から復帰しないときが、時々あります。そこで、しかたなく、パワーボタンを長く押して、OS再起動をするようになってしまう現象があります。
Ubuntu
Ubuntu
ubuntu 18.04
grub2の画面解像度を変更する方法
ubuntuインストール後に、画面の解像度が変更できない場合など、GRUBの設定を変更して画面解像度を設定することができます。
(2020年5月)さくらのクラウドでubuntu 18.04 をインストールし起動した場合、画面がVGAモード(640x480)に固定されてしまい、変更できませんでした。
GRUBを設定する方法(参考にしたサイト) https://qastack.jp/ubuntu/54067/how-do-i-safely-change-grub2-screen-resolution
/etc/default/grub を編集
#GRUB_GFXMODE=640x480 -> 変更もしくは追加
GRUB_GFXMODE=1024x768
保存して、更新 sudo update-grub
FAQ
Q: rootユーザになる
A: sudo su -
タグ:
オープンソースソフトウェア:
Windows
Windows
Windowsに関する、さまざま話題
デスクトップ
- Windows 2000/ME/98/95
- Windows XP
- Windows Vista
- Windows 7
- Windows 8
- Windows 10
- Windows 11
サーバー
- Windows Server 2000
- Windows Server 2003
- Windows Server 2008
開発環境
マイクロソフト社が提供して無料の開発環境、ダウンロードサイト ここから
主な開発環境のソフトとして、 Windows Phone, WebMatrix, Visual Web Developer 2010, Windows Azure Tools for Microsoft Visual Studio, Visual Basic 2010, Visual C++2010, Visual C#2010, Security Essentials, Windows Live Essentials, など
エディター Visual Studio Code 詳細情報は ここから
Windows コマンド
CHKDSK /F (ディスクのファイルシステムチェック)
便利なツール
HDDをフォーマット(ローレベルフォーマット対応)するソフト
バッファローのツール(Windows7対応) buffalo.jp/download/driver/hd/format.html
FAQ
- pingコマンドを実行するとIPアドレスなどが16進表示となってしまう場合は
IPv6が有効になっている場合は16進表示となるので、IPv4だけの設定に変更します。
タグ:
Visual Studio Code
Visual Studio Codeについて
インストール
SSH
Remote.SSH: Config File の設定画面では、PATHを設定しますが、PATHに¥ではなくバックスラッシュを使います。
Remote.SSH: Config File
The absolute file path to a custom SSH config file.Remote.SSH: Config File
C:\Users\ユーザ名\.sshconfig
config ファイルのサンプル
Host ホスト名
  HostName ホスト名
  User ログインユーザー名
  IdentityFile C:\Users\ユーザー名\id_rsa
  ForwardAgent yes
使い方
FAQ
タグ:
Windows:
Visual Studio Code
Visual Studio Codeについて
インストール
SSH
Remote.SSH: Config File の設定画面では、PATHを設定しますが、PATHに¥ではなくバックスラッシュを使います。
Remote.SSH: Config File
The absolute file path to a custom SSH config file.Remote.SSH: Config File
C:\Users\ユーザ名\.ssh\config
config ファイルのサンプル
Host ホスト名
  HostName ホスト名
  User ログインユーザー名
  IdentityFile C:\Users\ユーザー名\id_rsa
  ForwardAgent yes
リモートログイン先でのOSシステムで、SSH接続して、フォルダーを開くなどで「この大規模なワークスペース フォルダーでのファイルの変更をウォッチできません。この問題を解決するには、手順のリンクに従ってください。」という警告が表示されます。その場合は、Linux(DebianもしくはUbuntu)ではデフォルトが fs.inotify.max_user_watches=8192 なので、最大は524288ですが、メモリー消費を考えて、40000で設定してみました。
$ cat /proc/sys/fs/inotify/max_user_watches
8192
$ sudo vi /etc/sysctl.conf
最後の行に以下を追加
fs.inotify.max_user_watches=40000

$ sudo sysctl -p
fs.inotify.max_user_watches = 40000
Debian/Ubntu/Mac などのsudoコマンドを使う場合
VSCodeの拡張機能で、「Save as Root in Remote - SSH」をインストールしてから、SSHで接続したサーバーごとに、この拡張機能をインストールする設定にします。その後、ファイル保存時に、「F1キー」を押して、 「 >Save as Root 」を選択して保存します。詳しくは、以下のサイトで確認します。
「Save as Root in Remote - SSH」 https://marketplace.visualstudio.com/items?itemName=yy0931.save-as-root
アンインストール
参考にしたページは https://atmarkit.itmedia.co.jp/ait/articles/1810/12/news026.html
便利な「Visual Studio Code TIPS」は https://atmarkit.itmedia.co.jp/ait/series/9744/
Windows側
Windows 11、VSCode 1.68 の場合
通常のWindowsのプログラムのアンインストールをします。
その後、デフォルトのインストール先を確認し、Microsoft VS Codeを削除 C:\Users\ユーザー名\AppData\Local\Programs\Microsoft VS Code
sshファイル関係は C:\Users\ユーザ名\.ssh\config を削除します。
ユーザー設定ファイル C:¥Windows¥Users¥ユーザー名¥AppData¥Roaming\Code
VSCodeの拡張コードは C:\Users¥ユーザー名¥.vscode
リモート先のサーバー
Linux(debian 10 buster)の場合
リモートログインしたユーザー名の ~/.vscode-server
使い方
FAQ
Q. Windows11でのターミナルなどでのSSHの設定について知りたい
A. WindowsでのSSHの設定については以下のページを参考に
Windows での OpenSSH https://docs.microsoft.com/ja-jp/windows-server/administration/openssh/o...
Q. TeraTermターミナルで公開鍵でSSHの設定について知りたい
A. WindowsのTeraTermとLinuxサーバー側での設定は、以下を参考に
https://mugendennou.net/aws/awsconfig/connectsshwithkeyfile/
https://www.mk-mode.com/blog/2019/10/11/debian-10-ssh-installation/
Q. Debianでsudoコマンドを実行したい場合
A. 機能拡張モジュールをインストールします。私は、「Save as Root in Remote - SSH」という拡張モジュールをインストールしています。インストール後に、ファイル保存時に、F1キーを押して、「Save as Root」のコマンドを実行します。
タグ:
Windows:
Windows 11
Windows 11について
便利な機能
画面のスクリーンショット
「Windowsキー+ Shift + S」を押すと、スクリーンの選択範囲がクリップボードにコピーされます。
その他のショートカットについて: ここから
タグ:
Windows:
Windows 7
Windows 7 に関する話題
Windows 7 に関するトラブルなども含めた、さまざま話題について。
よくあるトラブルへの対応
1-1 ) 無線LAN
・無線LANでアクセスポイントが認識できても、接続できない場合
- 無線LANユニットのドライバーソフトが正常にインストールされてるか、確認しましょう。
- デバイスマネージャーで無線LANユニットが「有効になっているか」確認しまししょう。
- 念のために、ドライバーソフトなどの設定後は、Windows7を起動しましょう。
1-2 ) ネットワークでコンピュータの名前が見つからない
・ ネットワーク探索できるように設定したが、コンピュータ名がネットワーク(Workgroup)上で見つからない場合、
- Windows 7のコンピュータ名を英数字にしましょう。 漢字の入ったコンピュータ名は、NetBIOSで見つからない場合があります。
- 環境: Windows 7やWindows XP、Linux、Macなどの混在環境
■ アプリケーションソフトと拡張子の連携について
スタート -> コントロールパネル -> プログラム -> 既定のプログラム -> 関連づけを設定する -> 各拡張子とアプリケーションプログラムを設定
もしくは
ファイルをマウスの右クリック -> プログラムから開く -> 既定のプログラムの選択 -> 拡張子とアプリケーションプログラムを選択 -> 「この種類のファイルを」開くときには、選択したプログラムをいつも使う」をクリックする
・キーボードの操作
-画面ハードコピーの取り方
PrintScreen キーを押した場合は、画面の全領域をクリップボードに貼り付けます。
ALT + PrintScreen キーを押した場合は、現在のアクティブ領域(アクティブなウィンドウなど)をクリップボードに貼り付けます。
-マウスの右クリック
キーボードだけでマウス右クリックで表示されるメニューを表示させるには、キーボードの右下、コントロール(Ctrl)キーの左にある「メニューのようなアイコン」を押します。
・コマンドプロンプトを管理者権限で実行させたい
スタート > 検索ボックスで 「コマンド」 と入力する > 検索 > プログラム 「コマンド プロンプト」 を選択 > 右クリック > 管理者として実行 管理者権限モードのコマンドプロンプトが表示されます
・ Windowsをログインなしで、起動後、すぐにWindowsが使える環境にしたい!
一般ユーザーから、Windowsのユーザー名とパスワード入力は大変なので、Windows起動後にすぐにWindowsが使えるように(昔のWindowsのように)して欲しいとの相談が多いので、Windows 7 Home Editions 64bit にて、ユーザーパスワードを設定済みからパスワードなしに設定変更しましたら、Windows再起動後は、ログイン画面なしで、自動的にWindowsが使える環境になっておりました。
Windows7のデスクトップアイコンで、ゴミ箱などが非表示になったとき
① スタートメニューから [ コントロールパネル ] を選択します。
② [ コントロールパネル ] 画面で [ デスクトップのカスタマイズ ] を選択します。
③ [ デスクトップのカスタマイズ ] 画面で [ 個人設定 ] を選択します。
④ [ 個人設定 ] 画面で [ デスクトップアイコンの変更 ] を選択します。
⑤ [ デスクトップアイコンの設定 ] ダイアログが表示されるので、デスクトップに表示させたいアイコンにチェックし [ 適用 ] を選択します。
※ごみ箱を表示させない場合は、ごみ箱のチェックを外す。
Windows 7 インストール時のエラー エラーコード 0x8007045D
インストール時にDVDからインストールデータを読み込み中に読み込みエラーなどで、エラーコード 0x8007045D が表示される場合は、DVDドライブなどとの相性問題がある場合があります。DVDドライブを変更することで解決する場合があります。 もしくは、メモリーの不良や設定が合っていない場合もあります。メモリーを4GB以下、メモリークロックなどを使用しているメモリーと同じ設定にマザーボードを調整します。
Windows 7 を起動しています... で動かなくなった場合
この現象が起きた場合は、さまざま要因が考えられます。ハードウェアの不良、BIOS設定との整合性が合っていない、など。
もし、内蔵バッテリーが不良、もしくは外してWindows 7 を起動した場合などは、ノートPCで、「Windows 7 を起動しています」の画面になってから、HDDへアクセスし、次に、内蔵バッテリーにアクセスし、その状態で止まっている場合は、Enterキーを押すとログイン画面まで進む場合があります。
その後、電源オプション設定で、スリープモードなどをしない設定に変更して再起動してみて下さい。
Windowsのチューニング、使い勝手の改善
・ネットワークを早くする方法、改善
SNP(Scalable Networking Pack)を無効にする
1)現在の状態を確認します。
netsh int tcp show global
「Receive-Side Scaling状態」 「Chimney オフロード状態」 「NetDMA 状態」 の3種類のステータスを確認し、 enabled になっていた場合は、 disabled に変更します。
2)設定変更
変更する場合は、コマンドプロンプトを管理者モードで起動します。
netsh int tcp set global chimney=disabled
netsh int tcp set global rss=disabled
netsh int tcp set global netdma=disabled
3)設定の再確認
netsh int tcp show global
参考情報:
日経IT Pro Webサイト ITアーキテクトの「やってはいけない」 より
http://itpro.nikkeibp.co.jp/article/COLUMN/20100824/351391/
Windowsシステムをインストールしたドライブを拡張する場合
CドライブにWindowsをインストールして、そのCドライブが容量不足になった場合、Cドライブの容量を増やしたい時は、ダイナミックディスクを使います。
詳細は以下のURLで
http://asciipc.jp/blog/windows7/windows738/
http://pc.nikkeibp.co.jp/article/knowhow/20140812/1139684/?P=1
ダイナミックディスクが使えるWindowsは、UltimateとEnterpriseの2つのエディションだけです。
Widows XPモード
Windows7のProfessional以上のバージョンでは、マイクロソフトの仮想化(VirtualPC)によりWindowsXP(Professional)を無償でインストール、動作することができます。仮想化とWindowsXPはマイクロソフトのホームページからダウンロードします。 ここから
・ WindowsXPモードでWindowsのリモートデスクトップを使う場合
XPモードを標準インストールした段階では、ネットワーク設定は「共有ネットワークNAT」になっており、ネットワーク上の外部コンピュータからリモートデスクトップで接続できません。そこで、VirtualPCの設定メニュー「ツール」 > ネットワーク > アダプター 「実際のWindows7が稼働しているネットワークハードウェアを選択」します。 これで、Windows7と同じネットワークセグメントにXPモードのWindowsXPが表示されます。
スリープや休止状態から復帰できない場合
スタンバイモード、スリープ、休止状態から回復させる場合、長時間、そのままの状態で復帰するができない場合は、BIOSの設定を確認しましょう。 Sleepやスタンバイ、もしくはマウスやキーボードでの割り込み制御がEmabledになっているか確認し、設定することで、スリープや休止状態から、キーボードやマウスの割り込み信号を感知して復帰できるようになる場合があります。
休止状態が表示されない場合
Windows7をインストールした際に、スリープモードは表示されるが、休止状態が表示されまい場合は、Windows7の電源オプションで「スリープ」の「ハイブリッドスリープをオフ」に設定します。
スタート -> コントロールパネル -> ハードウェアとサウンド -> 電源オプション -> プラン設定の編集 -> 詳細な電源設定の変更 -> バランス -> スリープ -> ハイブリッドスリープを許可する -> 設定: オフ を選択
キーボードが英語モードになっている場合
日本語キーボードで、@や括弧などが正確に入力できないキーボード状態は、Windows 7 のコントロールパネル、デバイスマネージャー、キーボードがPS2 キーボードになっている場合が多いです。そこで、PS2キーボード設定を削除して、日本語キーボード [ 日本語 PS/2 キーボード (106/109キー Ctrl+英数)] を手動で設定します。
詳細は ここを参考に
MacでVMwareの仮想化システム FUSION などを使っている場合は、MacマシンでVMからすべて再起動して、MacからWindowsにログインしてからリモートデスクトップ(RDP)でログインします。先にリモートログインで接続しログインすると英語キーボード設定になります。
Windows:
Windows 8
Windows 8 に関する話題
Windows 8 および 8.1 のさまざまな話題
スタートボタン
Windows 7 のようなスタートボタンを使えるようにするフリーソフト
タグ:
Windows:
Windows XP
WindowsXP について
トラブル対応
WindowsXPでのマルチモニタートラブル
トラブルの現象:
ノートPC(Dell Inspiron6400 Windows XP)でマルチモニターをしていて、ノートPCだけの状態でマルチモニター画面を運用後、元のマルチモニター2台セットに設定すると、2台目のモニター設定が、1台目のノートPC設定と同じになる。 もしくは、 2台目の画面サイズが横長になり、解像度設定ができない障害となる場合。
対策:
Windowsをセーフモードで起動させ、コントロールパネルでディスプレイドライバーを削除し、Windowsを再起動。 通常のWindows起動状態で、ディスプレイドライバーを再設定する。 ドライバーソフトは、インストール済みのものを使用する。 Windowsを再起動させ、マルチディスプレイの設定をする。 これで、正常に使えるようになります。
また、ビデオディスプレイドライバーの再インストールと同じに、モニターの周波数も変更することで、マルチディスプレイ設定が更新され、トラブルが解決することがある。
Windows10
Windows 10
Windows 10 に関する話題
リモートデスクトップ
Home Editionの場合は、以下のRDPラッパーを使うとリモートデスクトップのサーバー機能になります。他のPCから接続できます。
RDP Wrapper Library https://github.com/stascorp/rdpwrap/releases/
Windows 10 が起動しない場合
シャットダウンなどが正常に終了しない状態が続くと、Windows10が正常に起動しない状況が起こることがあります。
その場合は、コマンドラインでHDDなどのブート領域設定を再設定するような作業を数回行なうか、Windows10の再インストールになる場合があります。
以下のサイトで修復コマンドなどを参考に。
- https://freesoft.tvbok.com/tips/does_not_boot/legacy_bootrec.html
- https://www.japan-secure.com/entry/how_to_start-up-repair-when-windows-1...
- https://pctrouble.net/running/chkdsk.html
- https://www.disk-partition.com/jp/windows-10/fix-mbr-windows-10.html
Windows 10 でVPN接続
接続できない場合は以下のURLを参考に
- https://www.uramiraikan.net/Works/entry-3212.html
- https://faq.interlink.or.jp/faq2/View/wcDisplayContent.aspx?id=787
また、Windows 10 のファイアウォール(Windows Defenderセキュリティセンター)でプライベートネットワークの設定を確認します。
「ファイアウォールとネットワーク保護」ー>「ファイアウォールによるアプリケーションの許可」で、「Secure Socketトンネリングプロトコル」を有効にし、必要に応じてサービスやアプリを許可有効にします。
VPN接続後、もし、共有サーバーなどが見つからいエラーが起きた場合、SSHコマンドなどでIPアドレス名でその共有サーバーに接続し、接続できれば、サーバー名で接続できるか確認します。サーバー名で繋がらない場合は、VPN接続しているWindows10のhostsファイルに、そのサーバー名とIPアドレスを記載することで、Windowsのネットワークでサーバーの共有名が見つかると思います。
Windows10のhostsファイルの編集は、管理者権限でエディター(メモ帳、notepadなど)を起動して、C:\Windows\System32\drivers\etc\hosts にあるhostsファイルを編集します。
アップグレード
Windows 7 からWindos 10 へのアップグレード
対象は:Windoows 7 Enterprise ボリュームライセンスからWindows 10 Enterpriseへのアップグレード
1)Windows10アップグレードソフトのダウンロード: https://www.microsoft.com/ja-jp/software-download/windows10%E3%80%80
2)USBメモリ(最低8GB以上)に、インストールメディアを作成
3)Windows 7を実行した状態で、USBメモリーのインストールプログラムを実行させる(setup.exe)。一般的には、USBメモリーで起動してインストール実行しますが、その場合は、Windows10 home, pro, educationの3種類しかインストールできません。
4)インストールプログラムを実行し、既存のライセンスを引き継ぐ設定でインストールします。その時に、なるべく、ユーザー情報やアプリは引き継がない設定が好ましいと思います。トラブルが少ないと思います。
インストールプログラム実行時にマイクロソフトからWindows最新情報を取得して更新する設定にした場合、途中でアップグレードインストールが止まってしまう現象が起こります。2021年12月18日に起こりました。その場合は、最新情報には更新しないで、現状のままでアップグレードインストールを選択して実行します。
5)インストールが終わればOKです。
アドレス帳を移行したい
アドレス帳のバックアップデータで、CSVファイルではなく、wabファイルおよび.contactファイルしかバックアップがない状態で、Windows10上のメールソフト(たとえば、Thunderberdなど)でアドレス帳をインポートしたい場合は、Windows10に古いWindows Mail 2012をインストールして、そのアドレス帳でエクスポートします。
Windows Live メール 2012 のダウンロード:
http://web.archive.org/web/20170120121901/http://wl.dlservice.microsoft....
参考にしたサイト: https://www.ikt-s.com/windows10_wlm2012_install/