Themes
Design Themeについて
デザインテンプレート
Morethanthemes
Morethanthemesサイト https://www.morethanthemes.com/
Drupal7やDrupal8の有料デザインテンプレートサイトです。無料版もありますが、ソースをすべて編集できる有料版(Pro版)がお勧めです。
日本語+英語の多言語サイトを構築するには
Morethanthemesサイトのデザインテンプレートは、多言語対応で、デフォルトが英語です。英語のほかに、日本語、ドイツ語などを翻訳するには、言語を追加して、翻訳機能を有効にします。
日本語をメインとするWebサイトにするためには、英語のデフォルトを日本語のデフォルトに変更します。
まず、英語をデフォルトで、日本語や他の言語を追加し、翻訳機能を有効にして、最後に、日本語をデフォルトにする設定のほうが、機能的にわかりやすい、設定が容易な多言語サイトになると思います。一度、英語がデフォルトの状態で作成されたコンテンツデータがある場合、途中でデフォルトの言語を日本語に変更すると、誤動作になる可能性があるかもしれません。
新規にコンテンツデータを作成する場合は、作成時のデフォルト状態を基本として考えます。
日本語をデフォルトに設定したときに、 言語判別の /ja /en などを変更調整します。
ただし、URLでの言語判別を選択しなくても、ブラウザなどの言語コードを判別する方法がスマートな設定になりそうです。その場合の設定は以下のようになります。
英語をインストール時のデフォルトで構築した場合、最初の設定(デフォルトを英語、その英語はインターフェイスの翻訳はなし)で運用構築します。英語と日本語を両方翻訳可能にも設定できるので、その場合は翻訳が誤動作することがあります。
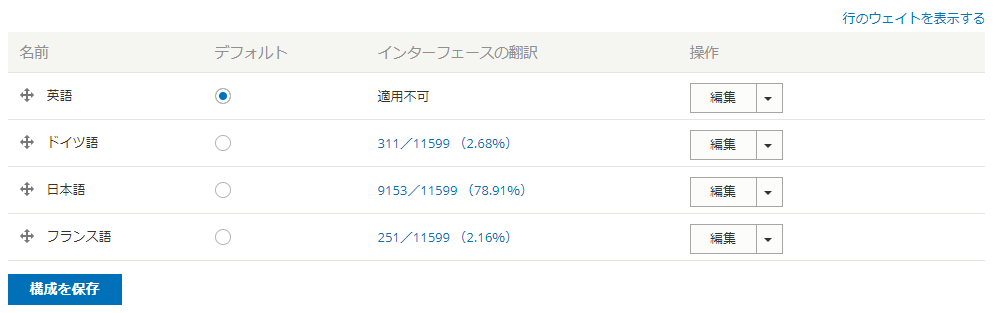
画像をクリックして拡大

URLでの言語判定を使わない場合は、翻訳作業などを行うときに、英語モードのブラウザと日本語モードのブラウザを使って、言語ごとにそのブラウザで操作するほうが、わかりやすいかもしれません。
ブロックの翻訳は、場所やブロック機能などにより、翻訳しても多言語切り替えがうまくいかない場合があるので、その場合は、ブロックの設定で、特定の言語だけで使うブロック設定を行い、その言語ごとにブロックを追加して運用します。
また、コンテンツやページ、ブロックなどに組み込んでいるスクリプトなどで表示される機能は、コア本体の多言語機能と連携しないので、そのスクリプトを言語ごとのコンテンツで多言語化させます。
Drupal8の新規クリーンインストールを日本語デフォルトで実施した環境では、この問題は影響しません。英語を追加して、翻訳設定するだけです。
Cookie Consent Module の日本語化(翻訳)
Cookie Consentモジュールは、外部のJavaScriptライブラリーを採用しており、Drupalの多言語化機能には対応しておりません(2020年1月19日)。
今後対応する予定のようです。詳細は、https://mtt.desk.com/customer/portal/questions/17513494-d8-cookie-consent-module-translate
抜粋
Question: D8 - Cookie consent module - translate
Answer:
the “Learn more” link and “Got it” button are set by the corresponding library as the default options.
You can check the link below for the corresponding options you can override in the JS initialization in order to set your own strings:
https://cookieconsent.insites.com/documentation/javascript-api/
https://www.screencast.com/t/pfzaVcpB
The file that you can use in order to set these is modules/custom/mt_cookieconsent/js/mt_cookieconsent.js.
Check the screenshot below for an example on how to override the “Got it” text:
https://www.screencast.com/t/0KYfivCc0fOI
参考: modules/custom/mt_cookieconsent/js/mt_cookieconsent.js ファイルを編集して、画面の色を変更し、日本語を追加したサンプルです。
/*
* MTCookieConsent scripts
* Add any module related script here
*/
(function ($, Drupal, drupalSettings) {
Drupal.behaviors.mt_cookieconsent = {
attach: function (context, settings) {
// can access setting from 'drupalSettings';
var theme_select = drupalSettings.mt_cookieconsent.theme_select;
var alert_message = drupalSettings.mt_cookieconsent.alert_message;
var target_url = drupalSettings.mt_cookieconsent.target_url;
window.addEventListener("load", function(){
window.cookieconsent.initialise({
"palette": {
"popup": {
/* "background": "#000" */
"background": "#f8f8ff" <---- !
},
"button": {
/* "background": "#fff" */
"background": "#add8e6" <---- !
}
},
"theme": theme_select,
"content": {
"message": alert_message,
"link": '詳細へ Learn more', <---- !
"dismiss": '同意します OK!', <---- !
"href": target_url
}
});
});
}
};
})(jQuery, Drupal, drupalSettings);
Migration to composer based site
※参考
Drupal 8 Composer install : 2019年9月22日現在
composer create-project drupal-composer/drupal-project:8.x-dev (my_site_name_dir) --no-interaction
概要はここから: https://mtt.desk.com/customer/portal/articles/2842962
抜粋
This article includes instructions on how to install a D8 distribution on a Composer-managed structure.
Make sure that you read the article “Using Composer to manage Drupal site dependencies” at Drupal.org, in order to understand the requirements and procedures of managing a site with Composer:
https://www.drupal.org/node/2718229
The steps below refer to the Level+ theme, as an example, but they can be applied to any of our premium Drupal 8 theme distributions.
1. Install Composer on your machine. For more information, visit https://getcomposer.org/doc/00-intro.md.
2. Install a Composer-based site. We recommend the following Composer template: https://github.com/drupal-composer/drupal-project
3. Add the modules the Level+ theme uses to your site by running composer require drupal/<modulename>. Note that you do not need to enable the modules included in the modules folder since they will be enabled by the database import that will take place later. For example, for the Level+ theme, these modules are:
- entity_reference_revisions
- paragraphs
- superfish
4. Copy all the contents of the theme folder of the Level+ distribution into your Composer-based installation.
5. Copy the folders /sites/default/files/YYYY-MM of the theme distribution into your Composer-based installation where YYYY-MM are date-related folder names. These folders contain images that are used on the demo website. For the Level+ theme, these folders are:
- /sites/default/files/2016-03
- /sites/default/files/2016-04
- /sites/default/files/2016-05
- /sites/default/files/2017-02
※他のテンプレート(minimalplus-academia)では、sites/ に mtt.settings.local.php というファイルがありました。テンプレートごとに必要なファイルをComposerベースの環境へ移行します。 さらに、以下の6.のように ..../sites/default/files/ 以下のファイルやディレクトリもすべてComposerベースの環境へ移行します。
6. Copy the following folders of the theme distribution into your Composer-based installation. These folders contain images and other files that are used on the demo website:
- /sites/default/files/pictures
- /sites/default/files/tmp
※他のテンプレート(minimalplus-academia)では、Drupal ROOTディレクトリに、 OneSignalSDKUpdaterWorker.js と OneSignalSDKWorker.js と example.gitignore と offline.html と service-worker.js というファイルがありました。テンプレートごとに必要なファイルをComposerベースの環境のDrupal ROOTディレクトリへコピーして移行します。
7. Make sure the web server has Write permissions for all the /sites/default/files/ folder and all its subfolders.
8. Import the database as described in the User Guide located in the ZIP file you downloaded.
※Drushコマンドの前に、Webブラウザで標準的なインストール手順でインストールを実行し、データベース名を設定して、その後、既存サイトへ移行する、によりデモ環境が立ち上がります。この時に、日本語のWebブラウザでインストールしますが、デモ環境は英語データだけ(多言語設定はしていない)になります。
9. Run drush cr
10. Run drush updb
By now, your installation should be completed. However, there is a chance that you will need to run the following command as an additional step:
drush entup
CSSファイルを追加修正する場合は、themes/custom/テーマ名/css/theme/local-theme.css を編集します。
Tourism
Composerベースのテーマにするには、上記の手順のほかに、元のテーマのソースデータで、....web/modules/contrib/ 以下のファイルとディレクトリも、移行先のComposerベースの環境にコピーします。
CSSファイルの編集
css/theme/local-theme.css ファイルを編集します。
Press+
テンプレートの概要: https://www.morethanthemes.com/themes/pressplus
CSSファイルの編集: ..../themes/custome/pressplus/css/theme/local-theme.css を編集
テンプレートのバージョン8.x-5.0.0 -> 8.x-5.1.0 へアップグレードする手順概要
概要はここから: https://docs.google.com/document/d/1hc-Tfwlwi5CNETZFG9Els4XU-jfsGO8BdhmWssXXDc4/edit
- 新規に8.x-5.1.0版のFull-Installでデモデータベース込みのPro版でインストールします。
- 既存の移行前の8.x-5.0.0版の環境をバックアップします。
- 念のために、既存の環境をメンテナンスモードに設定。
-
テーマファイル themes/custom/pressplus で必要なファイルを入れ替えます。 もし、CSSなどで、追加したファイル、例えば、local*.css などはバックアップして後で入れ替えます。
css/base/local-base.css
css/components/local-components.css
css/theme/local-theme.csspressplus.info.yml
pressplus.theme
pressplus.libraries.yml
/templates/field--block-content--mt-fancy-tabs-block.html.twig
/templates/field--block-content--mt-media-tabs-block.html.twig
/templates/field--block-content--mt-tabs-block.html.twig - キャッシュクリアとCronの実行
-
追加モジュールの更新と確認、例えば、更新するモジュールのディレクトリを削除、更新
Field Group (field_group) 8.x-3.0-rc1
Font Awesome (fontawesome) 8.x-2.13
Video Embed Field (video_embed_field) 8.x-1.6
Count Down (custom/mt_countdown) 8.x-1.0-beta3 - Drupal8コアのアップデイト、キャッシュクリア、Cronの実行
- メンテナンスモードの解除
Minimal+
環境 Minimal+ 8.x-5.4.0
表(テーブル)の罫線を表示させたい場合は、web/themes/custom/minimalplus/css/components/local-components.css ファイルに以下の設定を追加します。
※iPhoneで表示した場合、最上部と左側面の線が薄くなりますが、Android、PCでの表示では大丈夫でした。
table tr th {
/*  border-style: solid;  */
  border-width: 1px 1px 1px 1px;
 /*  color: #ffffff;
  padding: 15px 20px;
  font-size: 18px;
  font-weight: 700; */
}

table tr:first-child th {
  border-width: 1px 1px 1px 1px;
}

table tr td {
/*  border-style: solid; */
  border-width: 1px 1px 0px 0px;
/*  border-color: #707070;
  padding: 18px 20px;
  background-color: #ffffff;
  font-size: 15px;
  font-weight: 400;
  color: #6c6c6c; */
}

table thead + tbody tr:first-child th:first-child {
  border-top-width: 0px;
}

table tr th:last-child {
  border-right-width: 0px;
}

table tr:first-child td {
  border-top-width: 0px;
}

table tr:last-child td {
  border-bottom-width: 0px;
}
table thead + tbody tr:first-child td {
  border-top-width: 0px;
}
table tr th:first-child,
table tr td:first-child {
  border-left-width: 0px;
}
table tr th:last-child,
table tr td:last-child {
  border-right-width: 0px;
}
タグ:
fontawesome
Font Awesome Iconsモジュール
モジュール: https://www.drupal.org/project/fontawesome
インストール: composerでインストールした後に、 ライブラリーをダウンロードして、libratrariesにfontawesomeというディレクトリ名で保存します。
ダウンロード: https://fontawesome.com/download
Font Awesome in /libraries/fontawesome (only if using the local version - CDN version has no dependencies)